Retrograde Intrarenal Surgery

What Is Retrograde Intrarenal Surgery (RIRS)?
RIRS is a minimally invasive endoscopic technique used to remove kidney stones by entering the urinary system through natural body openings.
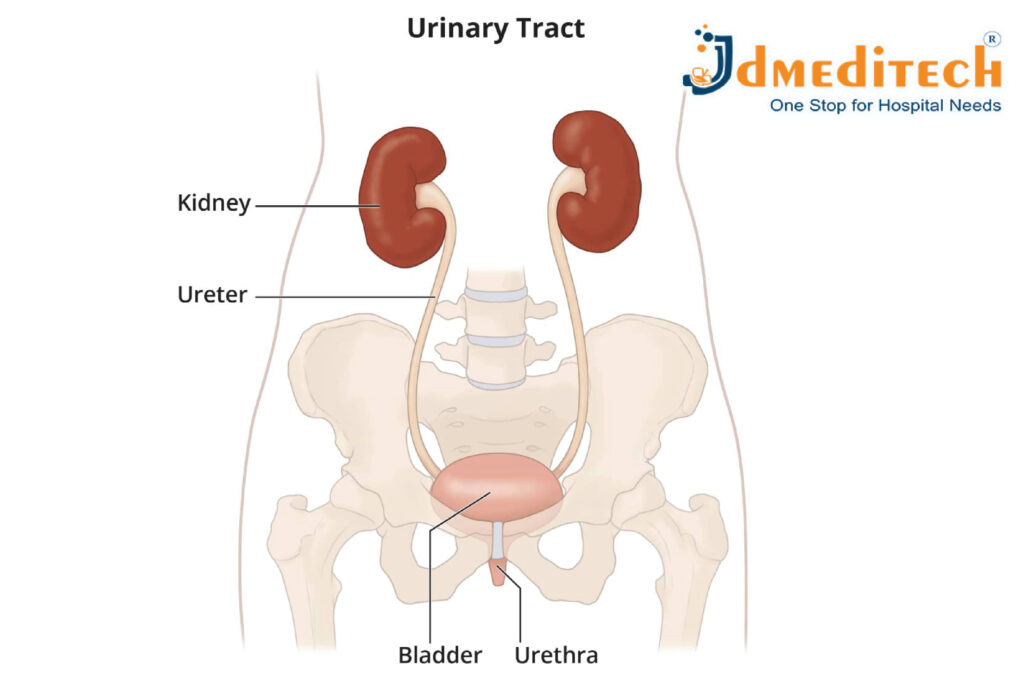
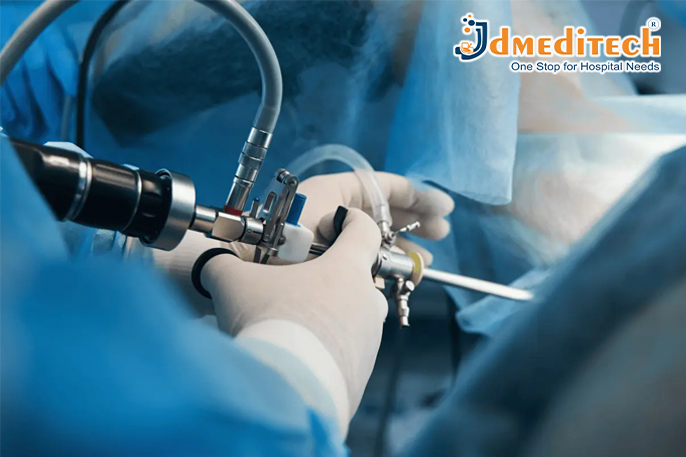
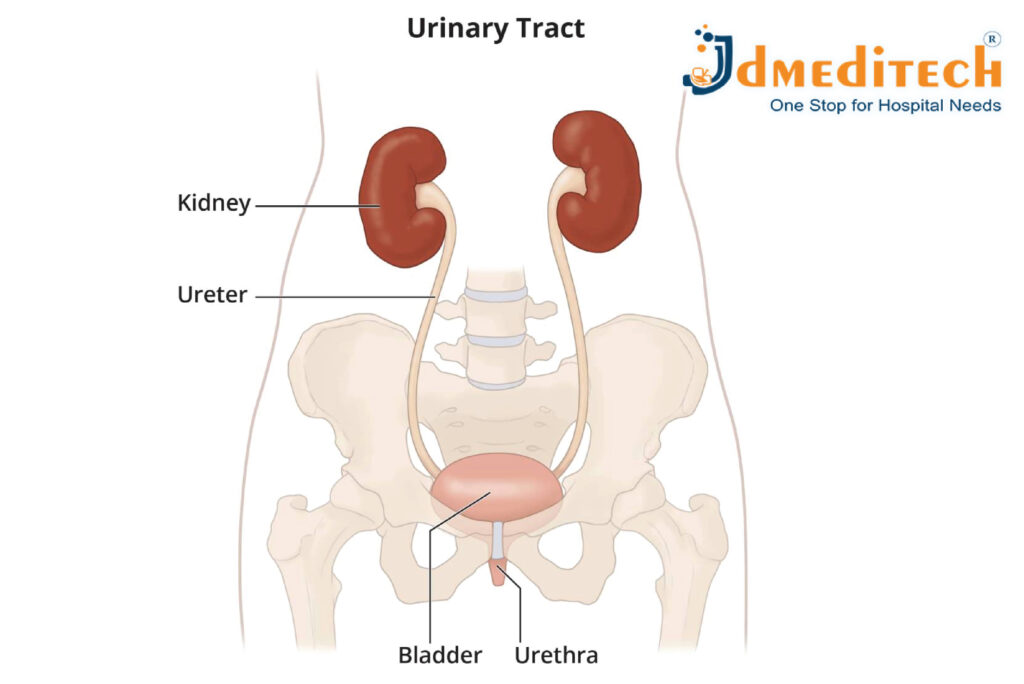
Instead of making any cuts on the body, surgeons pass a flexible ureteroscope through the urethra → bladder → ureter → kidney to reach the stone. Once the stone is located, it is fragmented using a Holmium:YAG or Thulium laser, and tiny pieces are removed or allowed to pass naturally.

When Is RIRS Recommended?
Doctors recommend RIRS in cases such as:
• Kidney stones up to 2 cm in size
• Stones located in the renal pelvis or calyces
• Stones that failed to clear with ESWL (Shock Wave Lithotripsy)
• Patients who are not suitable for PCNL due to bleeding risk
• Stones in children
• Anatomical abnormalities of the urinary tract
• Stones in obese, elderly, or medically unfit patients
RIRS is increasingly preferred due to its high success rate and minimal complications

Procedure of RIRS
The RIRS procedure is done under general or spinal anesthesia and usually takes 45–90 minutes depending on stone size.
1. Accessing the Urinary Tract
A thin flexible ureteroscope is carefully passed through the urethra and bladder into the ureter.
2. Reaching the Kidney
The scope is guided into the kidney chamber where the stone is located.
3. Laser Stone Fragmentation
A fine laser fiber targets the stone and breaks it into small sand-like pieces.
Holmium or Thulium laser is typically used due to its precision and safety.
4. Stone Removal
Small fragments may be removed using a tiny basket, while the rest pass out naturally through urine.
5. Stent Placement (If Needed)
A temporary DJ stent may be inserted to help urine flow and reduce postoperative discomfort.
It is usually removed after 1–2 weeks.

Benefits of RIRS
RIRS offers multiple advantages, making it one of the best treatment options for kidney stones.
✔ No Cuts, No Scars
Entirely endoscopic—performed through the natural urinary tract.
✔ Safe for All Age Groups
Effective in children, elderly patients, and those with comorbidities.
✔ Minimal Pain & Fast Recovery
Less postoperative pain compared to PCNL.
✔ High Stone Clearance Rate
Laser technology ensures complete stone fragmentation.
✔ Short Hospital Stay
Most patients go home within 24 hours.
✔ Reduced Risk of Complications
Lower chances of bleeding and infection.

Recovery After RIRS
Recovery from RIRS is quick and smooth. Patients may experience mild burning sensation or blood-tinged urine for 1–2 days.
Postoperative Care Includes:
• Drinking plenty of water
• Taking prescribed antibiotics and pain relievers
• Avoiding heavy physical activity for a week
• Following up for stent removal on the scheduled date
Most people return to normal activities within 2–3 days.

Risks and Possible Complications
Although rare, some minor risks include:
• Mild urinary infection
• Temporary discomfort due to DJ stent
• Small residual stone fragments
• Bleeding (very minimal)
With modern instruments and experienced surgeons, complications are uncommon.

Conclusion
Retrograde Intrarenal Surgery is a highly effective, minimally invasive, and patient-friendly treatment for kidney stones. With no external incisions, faster recovery, and excellent outcomes, RIRS has become a preferred choice for both patients and urologists. Whether stones are small, difficult-to-reach, or recurrent, RIRS provides a safe and advanced solution with minimal discomfort.

Explore More Product >>

Get Connected:
+91 79909 93062 | +91 63513 72032 | exports@jdmeditech.com

Chronic Kidney Disease And Dialysis Procedure

What Is Chronic Kidney Disease?
Chronic Kidney Disease (CKD) is a long-term health condition in which the kidneys slowly lose their ability to function properly over time. The kidneys are responsible for filtering waste products, toxins, and excess fluid from the blood. When they become damaged, these harmful substances start to build up in the body, leading to serious health problems.
CKD develops gradually, often over months or years, and may not show noticeable symptoms in its early stages. As the disease progresses, kidney function continues to decline, eventually leading to End-Stage Renal Disease (ESRD)—a stage where the kidneys can no longer support the body’s needs. At this point, patients require dialysis or a kidney transplant to survive.

What are the symptoms of CKD?
Chronic Kidney Disease (CKD) is a progressive condition, and its symptoms often appear gradually as kidney function deteriorates. In the early stages, CKD may not show any noticeable symptoms because the kidneys can still compensate for minor damage. However, as the disease progresses, the buildup of toxins, excess fluid, and electrolyte imbalance leads to a variety of physical and metabolic symptoms.
Patients may begin experiencing persistent fatigue, weakness, and lack of energy due to anemia and toxin accumulation. Swelling in the feet, ankles, hands, and face is common as the kidneys lose their ability to remove extra fluid. Many individuals notice changes in urination, such as foamy urine, increased nighttime urination, or reduced urine output.
Other symptoms include nausea, vomiting, loss of appetite, and a metallic taste, which result from rising waste levels in the bloodstream. High blood pressure, muscle cramps, itchy or dry skin, and difficulty concentrating also indicate declining kidney function. In advanced stages, CKD can lead to breathlessness, severe fluid retention, chest discomfort, and almost no urine production, signaling the onset of kidney failure.
Recognizing these symptoms early and seeking medical evaluation can significantly slow disease progression and improve long-term outcomes.

Symptoms of advanced CKD

Common Symptoms of Advanced CKD (Stage 4–5)
1. Severe Fatigue and Weakness
Due to anemia and toxin buildup, patients feel extremely tired and weak and lack energy.
2. Swelling (Edema)
Significant swelling appears in the legs, ankles, feet, hands, and sometimes around the face due to fluid retention.
3. Very Little or No Urine Output
The kidneys fail to produce normal amounts of urine, even though fluid is building up inside the body.
4. Shortness of Breath
Fluid buildup in the lungs causes difficulty breathing, even while resting.
5. Nausea and Frequent Vomiting
Excess waste in the bloodstream leads to digestive discomfort, nausea, and loss of appetite.
6. Extreme Itching (Uremic Pruritus)
High levels of waste products cause persistent and sometimes severe itching.

What Is Hemodialysis?
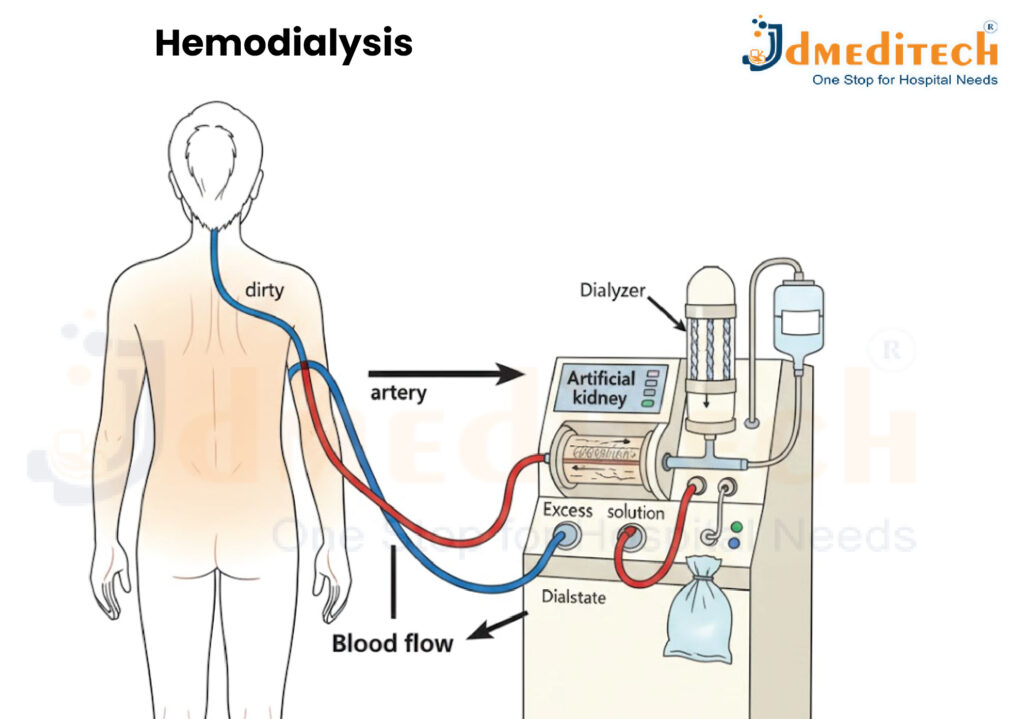
Hemodialysis is a medical procedure used to remove waste products, toxins, and excess fluid from the blood when the kidneys are no longer able to perform these functions effectively. It acts as an artificial kidney for people with advanced Chronic Kidney Disease (CKD) or kidney failure.
During hemodialysis, blood is taken out of the body, cleaned using a machine called a dialyzer, and then returned to the body. This process helps maintain fluid balance, remove harmful substances, and keep electrolytes like potassium and sodium at healthy levels.

How Does Hemodialysis Work?
1. A vascular access (fistula, graft, or catheter) is created to allow blood to flow in and out of the body.
2. Blood travels through tubing into the dialysis machine.
3. Inside the dialyzer, the blood passes through a special filter that removes waste and excess water.
4. Clean blood is then returned to the body through the same access.
5. This cycle continues for the duration of the session.

What Is Peritoneal Dialysis?

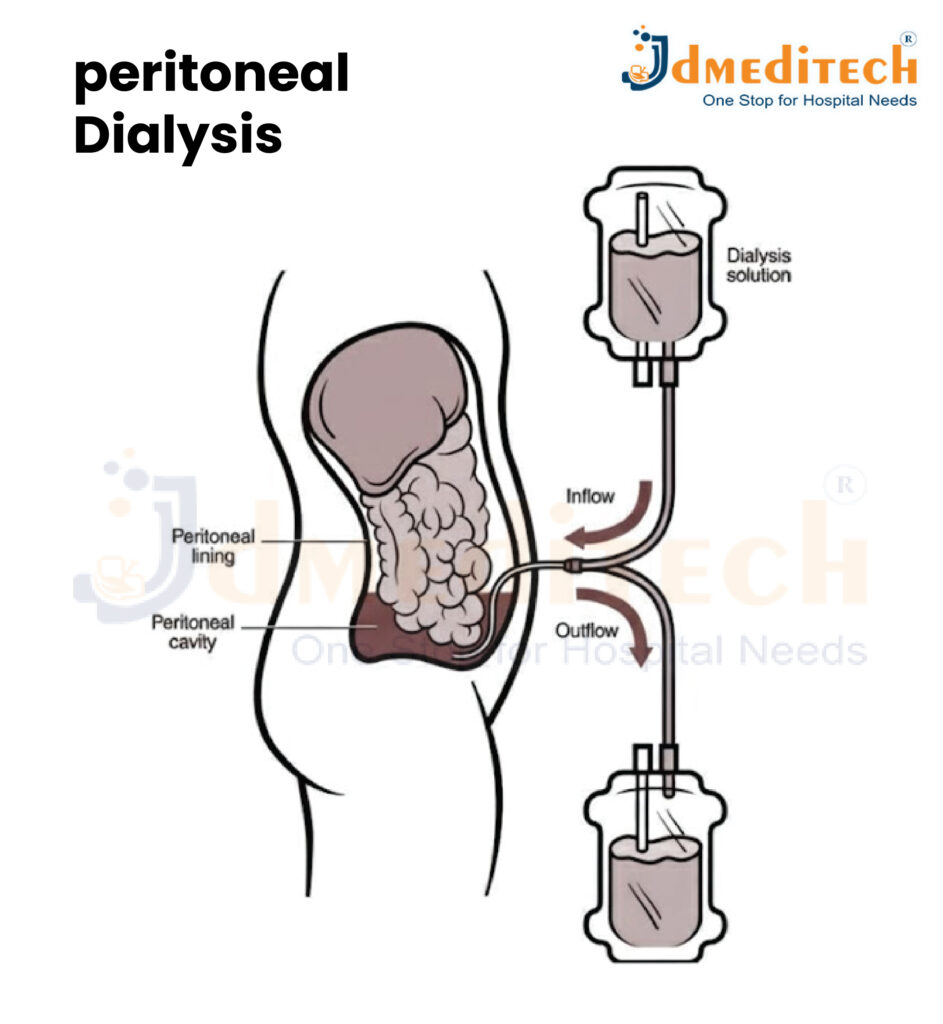
Peritoneal dialysis (PD) is a type of dialysis that uses the lining of your abdomen—called the peritoneal membrane—to filter waste and excess fluid from the blood. Instead of using a machine like hemodialysis, this method relies on the body’s natural membrane as a filter.

A sterile dialysis fluid is introduced into the abdominal cavity through a soft tube called a peritoneal dialysis catheter. Waste products pass from the blood into the fluid. After a few hours, the used fluid is drained out and replaced with fresh solution.
Peritoneal dialysis is often done at home, giving patients more flexibility and independence.

Types of Peritoneal Dialysis
1. Continuous Ambulatory Peritoneal Dialysis (CAPD)
• Manual process
• No machine required
• Usually 3–4 exchanges per day
• The patient can walk and do daily activities while fluid is inside the abdomen
2. Automated Peritoneal Dialysis (APD)
• Performed using a machine called a cycler
• Usually done at night while the patient sleeps
• More convenient for many people

What Happens During Peritoneal Dialysis?
Peritoneal dialysis (PD) cleans the blood by using the natural lining of the abdomen—the peritoneal membrane—as a filter. The process happens inside the body and does not require blood to leave the bloodstream. Instead, a special cleansing fluid removes waste and extra fluid.


Conclusion

Chronic kidney disease is a progressive condition that requires timely diagnosis and continuous management. When the kidneys fail, dialysis becomes essential to sustain life. Understanding different types of dialysis and how they work helps patients and families make informed healthcare decisions.
With proper treatment, lifestyle changes, and regular follow-up, CKD patients can lead stable and meaningful lives while preparing for the possibility of a kidney transplant.

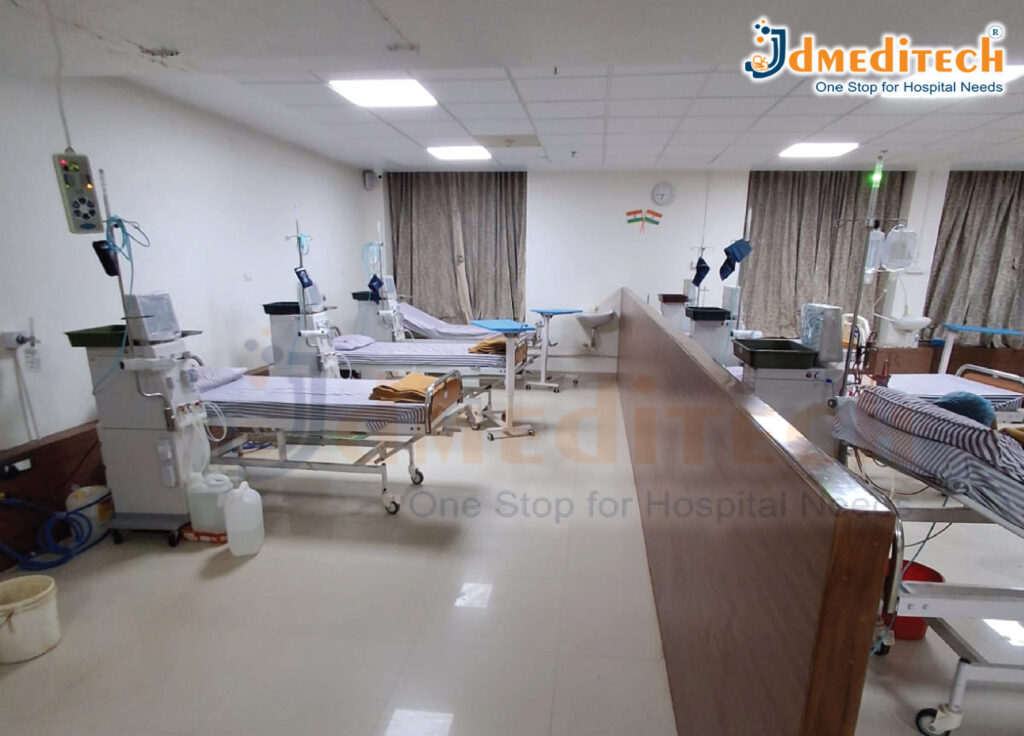
Hemodialysis SETUP

ACDF (Anterior Cervical Discectomy And Fusion) Surgery

ACDF (Anterior Cervical Discectomy and Fusion) is a widely performed spine surgery used to treat nerve compression in the neck caused by conditions like herniated discs, degenerative disc disease, or spinal stenosis. It helps relieve neck pain, arm pain, numbness, and weakness and restores normal movement.
What is ACDF?
Anterior Cervical Discectomy and Fusion (ACDF) is a surgical procedure used to treat conditions in the neck—particularly those where a disk in the cervical spine is herniated or degenerative, causing pressure on nerves or the spinal cord.
During ACDF:
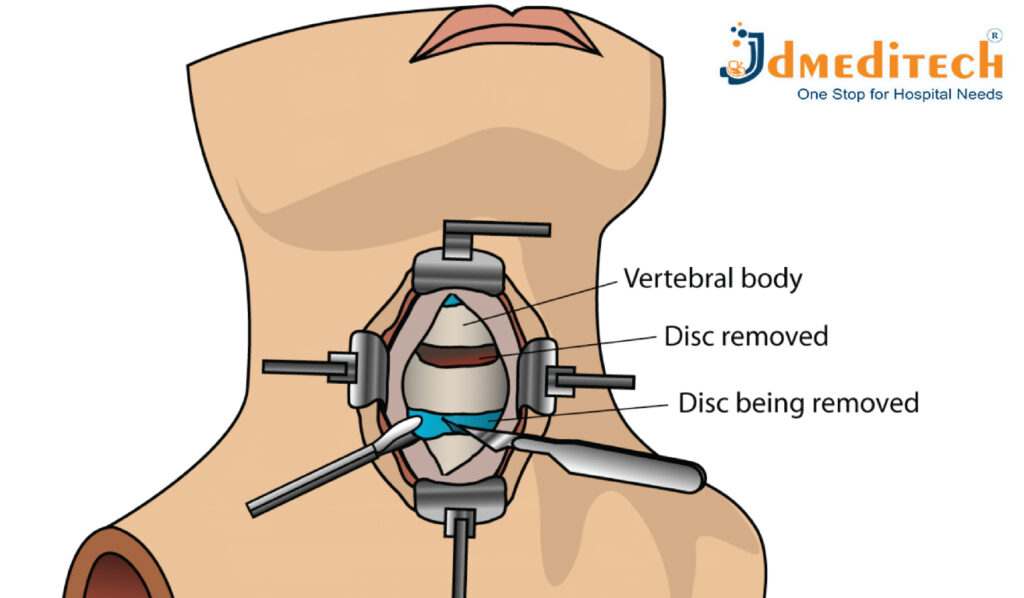
• The surgeon approaches the spine from the front (through the throat/neck area) and removes the diseased or herniated disk (and often bone spurs), thereby relieving pressure on nerves or the spinal cord.
• Then, a “fusion” is done: adjacent vertebrae are stabilized using a bone graft or spacer (sometimes a cage), and plates/screws are often fixed to hold them in place while the bone fuses over time.
How Is ACDF Surgery Performed?
ACDF is usually performed under general anesthesia and takes about 1–2 hours, depending on the number of levels treated. Incision on the front of the neck
A small cut is made to access the cervical spine.

1. Disc removal
The damaged or herniated disc is carefully removed.
2. Nerve decompression
Bone spurs or tissue pressing on nerves are cleared.
3. Placement of bone graft or cage
An implant is inserted to maintain disc height.
4. Fusion with plate and screws
Metal hardware stabilizes the spine and helps fusion.
5. Closure
The incision is stitched and covered.

Benefits of ACDF Surgery
• Relieves neck and arm pain
• Restores nerve function
• Improves mobility and strength
• Stabilizes the spine
• Corrects compression of spinal cord or nerves
• Prevents worsening neurological symptoms

What Happens During ACDF Surgery?

ACDF (Anterior Cervical Discectomy and Fusion) is a structured spine procedure done to relieve pressure on the spinal cord or nerves in the neck. The surgery typically takes 1–2 hours, depending on the number of levels involved. Here is a step-by-step explanation of what happens:
1. Anesthesia and Positioning
• The patient is given general anesthesia, ensuring they remain fully asleep and pain-free.
• They are positioned on their back with the neck slightly extended to allow the surgeon clear access to the cervical spine.
2. Small Incision on the Front of the Neck
• The surgeon makes a small incision (3–4 cm) on one side of the front of the neck, usually near a natural skin crease.
• This approach avoids major muscles and allows a gentle, safe path to the spine.
3. Accessing the Cervical Spine
• Soft tissues like the esophagus, trachea, and neck muscles are carefully moved aside—not cut.
• Specialized instruments are used to expose the problematic disc between the cervical vertebrae.

4. Removing the Damaged/Herniated Disc (Discectomy)

• The surgeon removes the entire damaged or herniated disc causing pressure on nerves or the spinal cord.
• Any bone spurs (osteophytes) or fragments pressing on nerves are also removed.
• This step creates space and relieves compression.
5. Preparing the Disc Space
• After removing the disc, the empty disc space is cleaned and prepared.
• This helps promote proper fusion and alignment.
6. Inserting a Bone Graft or Cage
• A bone graft or interbody cage is placed into the disc space.
• This material helps the two vertebrae grow together (fuse) over time.
• The graft is usually:
o Patient’s own bone (rare)
o Donor bone
o Synthetic material
7. Stabilizing With a Plate and Screws (Fusion)
• A small titanium plate is fixed to the front of the vertebrae using screws.
• This keeps the spine stable and holds the graft securely until fusion occurs naturally.
8. Closing the Incision
• Once stability is confirmed:
o Muscles and soft tissues are placed back gently.
o The skin is closed with sutures.
• A small bandage is applied.
9. Recovery in the Hospital
• After surgery, the patient is moved to the recovery room.
• Most patients:
o Are awake within minutes
o Can walk the same day
o Stay 1 day in the hospital
• A neck collar may be recommended to support healing.
10. Healing & Fusion Process
• Although recovery begins immediately, the fusion process takes 3–6 months.
• Follow-up X-rays monitor how well the bones are fusing.

Conclusion

ACDF is a well-established, commonly performed spinal surgery that—for the right patient—can greatly improve quality of life by relieving nerve compression, pain, and weakness and restoring function. At the same time, as with any major surgery, it carries risks and requires careful patient selection, meticulous surgical technique, and disciplined postoperative care.

Explore More Product >>

Get Connected:
+91 79909 93062 | +91 63513 72032 | exports@jdmeditech.com

Laparoscopic Surgery

What Is Laparoscopic Surgery?
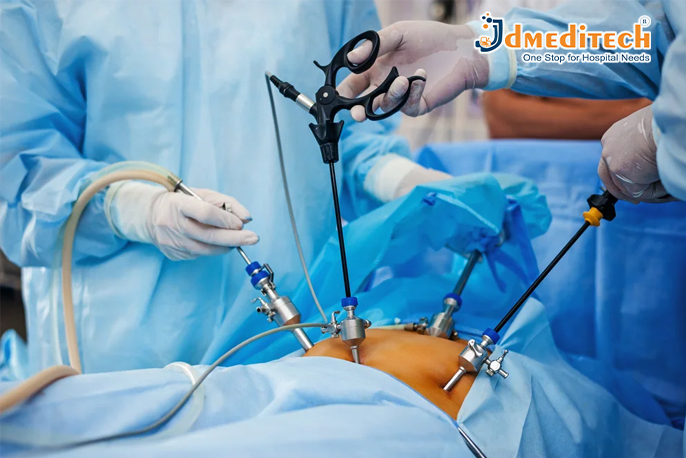
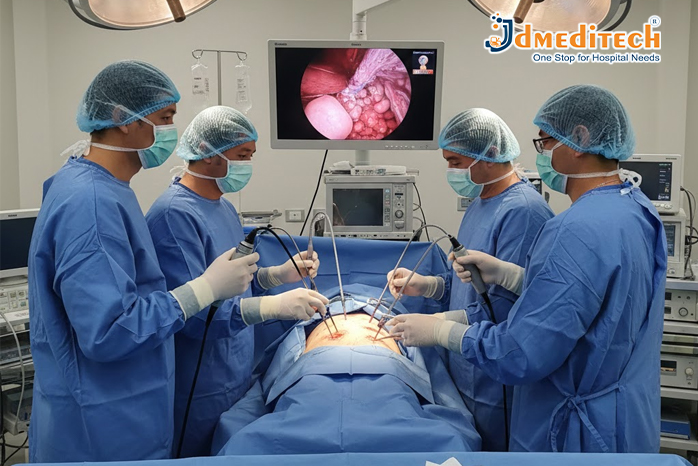
Laparoscopic surgery involves the use of a laparoscope, a thin tube with a high-resolution camera and light source. This device allows surgeons to view internal organs on a digital monitor in real time. Through additional small incisions, other instruments are inserted to perform the surgical procedure with precision.
This technique is commonly used for abdominal and pelvic surgeries, making it a preferred option for both surgeons and patients.

How Is Laparoscopic Surgery Performed?
1. Anesthesia is administered to ensure the patient feels no pain.
2. Small incisions are created in the abdomen.
3. Carbon dioxide gas is used to gently inflate the abdominal cavity for better visibility.
4. A laparoscope is inserted to project a clear image on a monitor.
5. Specialized surgical instruments are inserted through additional ports.
6. After completing the procedure, instruments are removed, CO₂ is released, and incisions are closed with sutures.

Common Procedures Performed Through Laparoscopy
Laparoscopic surgery can be used to diagnose and treat many conditions. Some widely performed laparoscopic procedures include:
• Laparoscopic Cholecystectomy (Gallbladder removal)
• Laparoscopic Appendectomy
• Laparoscopic Hernia Repair
• Laparoscopic Hysterectomy
• Laparoscopic Ovarian Cyst Removal
• Laparoscopic Bariatric Surgery
• Laparoscopic Diagnostic Procedures

Benefits of Laparoscopic Surgery
Laparoscopic procedures offer significant advantages over open surgery:
✔ Smaller Incisions
Only 0.5 cm to 1 cm incisions are made, resulting in minimal tissue damage.
✔ Less Pain & Discomfort
Patients experience less postoperative pain due to reduced trauma.
✔ Faster Recovery Time
Most patients can return to normal activities much sooner.
✔ Minimal Blood Loss
Smaller incisions help reduce bleeding during surgery.
✔ Lower Infection Risk
Smaller wounds reduce the chances of infection.
✔ Better Cosmetic Results
Tiny scars heal quickly and are barely visible.

Conclusion
Laparoscopic surgery has revolutionized the medical world with its minimally invasive nature, faster recovery, and excellent surgical outcomes. As technology continues to advance, more procedures are being performed laparoscopically, offering patients safer and more effective treatment options.

Explore More Product >>

Get Connected:
+91 79909 93062 | +91 63513 72032 | exports@jdmeditech.com

Hysteroscopy Surgery

What Is Hysteroscopy?
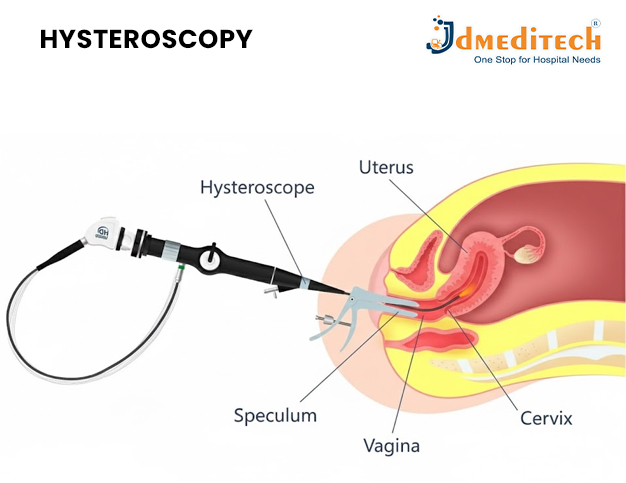
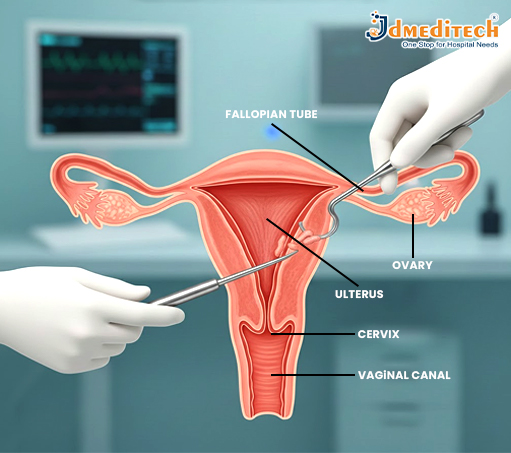
Hysteroscopy involves inserting a small telescope-like device through the vagina and cervix to examine the uterine cavity. This procedure helps doctors identify abnormalities such as polyps, fibroids, scarring, abnormal bleeding, and infertility-related issues. It can be done for both diagnostic and treatment purposes.

What is diagnostic hysteroscopy?
Diagnostic hysteroscopy is a minimally invasive procedure used to examine the inside of the uterus to identify the cause of symptoms such as abnormal bleeding, infertility, or recurrent miscarriages.
A thin, lighted instrument called a hysteroscope is inserted through the vagina and cervix into the uterus. This allows the doctor to view the uterine cavity on a monitor with high clarity—without any cuts or stitches.

What is operative hysteroscopy?
Operative hysteroscopy is a minimally invasive surgical procedure used to treat problems inside the uterus that are detected during a diagnostic hysteroscopy or ultrasound.
Instead of making cuts on the abdomen, the surgeon uses a hysteroscope (a thin, lighted telescope) inserted through the vagina and cervix. Special miniature surgical instruments are passed through the hysteroscope to perform the required treatment.

When is operative hysteroscopy used?

1. Uterine Polyps
To remove soft tissue growths that cause heavy bleeding, irregular periods, or infertility.
2. Submucosal Fibroids
To remove fibroids growing inside the uterine cavity that cause pain, bleeding, or pregnancy issues.
3. Uterine Septum
To correct a congenital wall dividing the uterus, which can cause miscarriage or infertility.
4. Uterine Adhesions / Scar Tissue (Asherman Syndrome)
To remove scar tissue that may be causing missed periods, pelvic pain, or fertility problems.
5. Retained Products of Conception
To remove tissue remaining after miscarriage or abortion that can lead to infection or bleeding.
6. Removal of Lost or Embedded IUD
When an intrauterine device cannot be removed through normal methods.
7. Abnormal Uterine Bleeding
To treat the cause of heavy or prolonged menstrual bleeding that is linked to structural issues.
8. Endometrial Abnormalities
To remove abnormal tissue growths for biopsy or treatment.
9. Tubal Opening Evaluation or Treatment
In some cases, to open blocked tubal openings near the uterus (selective tubal cannulation).

Conclusion
Hysteroscopy is one of the most advanced and reliable techniques for diagnosing and treating uterine problems. Its minimally invasive nature, accuracy, and fast recovery make it an ideal choice for many women. If you are experiencing abnormal bleeding, infertility, or pelvic discomfort, consult your gynecologist to see if hysteroscopy is right for you.

Explore More Product >>

Get Connected:
+91 79909 93062 | +91 63513 72032 | exports@jdmeditech.com

Dilation and Curettage (D&C)

What is dilation and curettage (D&C)?
Dilation and curettage, sometimes known as D&C, is a gynecological procedure that involves the gentle opening of the cervix—the lower part of the uterus—and the removal of tissue from inside the uterus using a specialized instrument called a curette.
Depending on the circumstances, D&C can also be performed under suction—that is, vacuum—rather than sharp curettage.

Why is D&C used?
D&C may be both a diagnostic and therapeutic procedure. Indications for a D&C include:
• Investigating and diagnosing abnormal uterine bleeding, postmenopausal bleeding, and unexplained changes in menstrual cycles.
• Removing abnormal endometrial tissue, such as polyps, overgrown uterine lining, or suspected precancerous/cancerous changes.
• Clearing the uterus following a miscarriage or termination of pregnancy to ensure that no fetal or placental tissue remains.
• Removal of retained fragments of placenta after delivery or abortion, which may cause hemorrhage or infection.
Due to its flexibility and effectiveness, D&C remains one of the most common procedures when uterine sampling or tissue removal is required.

What to Expect—Procedure & Recovery Before the Procedure
•Your physician will discuss with you your medical history and advise any preoperative preparations, such as fasting or the use of any medication, as may be required.
• You will be asked to empty your bladder before the procedure. Depending on the indication and clinical circumstance, local or general anesthesia might be administered.

During the Procedure
• The speculum is inserted gently to visualize the cervix. Then, the cervix is slowly dilated using graduated dilators.
• Once dilation is sufficient, a metal or plastic curette or suction device is introduced to remove lining or tissue from the uterus.
• The tissue removed may be sent to the laboratory for analysis—looking for polyps, abnormal cells, or other pathology—if the D&C was performed for diagnostic purposes.
• The procedure itself is relatively quick; many D&Cs take about 10–20 minutes.
After the Procedure: Recovery & Home Care
•After D&C, many people experience mild cramping (like menstrual cramps) and light bleeding or spotting for a few days.
• Use sanitary pads, not tampons, to decrease your infection risk. Do not engage in vaginal intercourse, nor insert a tampon into the vagina, until your doctor lets you know that this will be safe, which is generally in about a week, though timing may vary.
• Most individuals return to normal activities within a few days.
•Many surgeons will schedule a follow-up appointment within 1–2 weeks, especially if the tissue was sent for pathology, to review the results and make sure the healing is normal.

Why Choose JD Meditech for Gynecology Instruments? ISO-certified manufacturer
• International-standard surgical instruments
• Rust-free, medical-grade stainless steel
• Ergonomic, surgeon-friendly design
• Export quality products with reliable performance
Our various products enjoy immense trust in hospitals, clinics, and healthcare facilities across the world.
Conclusion
D&C is a safe and effective diagnostic and treatment method for a variety of uterine problems. Availing themselves of the most advanced gynecology instruments offered by JD Meditech, healthcare professionals can conduct D&C with precision and confidence, ensuring better outcomes and patient care.

Explore More Product >>

Get Connected:
+91 79909 93062 | +91 63513 72032 | exports@jdmeditech.com

Manufacturing of Medical Devices in India

India’s medical device manufacturing industry is rapidly evolving, transforming the country into a global hub for high-quality and affordable healthcare technology. With strong government support, advanced manufacturing capabilities, and rising demand for healthcare services, India is now one of the fastest-growing medical device markets in the world.
This growth has opened new opportunities for manufacturers, exporters, and healthcare providers, making India a preferred destination for reliable and cost-effective medical devices.

Advanced Manufacturing Capabilities
India now hosts state-of-the-art manufacturing facilities equipped with:
• Precision engineering
• CNC and automated machinery
• Quality inspection and testing labs
• Sterilization & cleanroom environments
Manufacturers like JDMeditech use advanced technology to deliver reliable, safe, and innovative medical devices for global markets.

Major Categories of Medical Devices Manufactured in India
1. Urology Instruments
• TURP Resectoscope
• Ureteroscope (Rigid & Flexible)
• URS Forceps, Baskets
• RIRS Scopes & Accessories
• Laser Surgery Instruments
2. Laparoscopy & Endoscopy Equipment
• Laparoscopic hand instruments
• Telescopes & camera systems
• Insufflators, light sources
• Trocar & cannula
3. Gynecology & Obstetrics Devices
• Hysteroscope
• D&C instruments
• Vacuum delivery systems
4. ENT & General Surgery Devices
• Sinuscopes
• Rigid endoscopes
• Surgical forceps & scissors
5. Hospital Equipment
• Operating tables
• LED OT lights
• ICU & emergency care devices
Companies like JDMeditech play a key role in supplying a complete range of devices across these categories.

The Future of Medical Device Manufacturing in India
With continuous investment in R&D, digital healthcare technology, and automation, India’s medical device industry is expected to reach USD 50 billion by 2030. The focus is shifting towards:
• Robotics in surgery
• AI-driven diagnostics
• Minimally invasive surgical instruments
• Laser and imaging technologies

Export Scenario of Medical Devices in India
India’s medical device export sector has shown remarkable growth over the past decade, positioning the country as a reliable global supplier of high-quality and competitively priced medical equipment. With increasing international demand, better manufacturing standards, and strong government support, India is emerging as a major export hub for surgical instruments, endoscopy equipment, diagnostic devices, and hospital supplies.
India has a 75-80% import dependency on medical devices. Export of medical devices from India stood at US$ 2.53 billion in FY21 and is expected to rise to US$ 10 billion by 2025.
To increase the export of medical devices in the country, the Ministry of Health and Family Welfare (MOHFW) and Central Drugs Standard Control Organisation (CDSCO) implemented the following initiatives:
Re-examination and implementation of Schedule MIII (a draft guidance on good manufacturing practices and facility requirements) System for export labelling Clinical evaluation and adverse reporting clarification State licensing authority to extend free sales certificate validity from 2 years to 5 years to allow exports Create a list of manufacturers with export licensing for easy access to regulatory authorities worldwide.


Conclusion

The manufacturing of medical devices in India is experiencing remarkable growth. Supported by advanced technology, government initiatives, and skilled engineering expertise, India is becoming a trusted global supplier of high-quality and affordable medical devices.
JDMeditech proudly contributes to this mission by delivering world-class urology, endoscopy, and surgical equipment for healthcare professionals around the world.

Explore More Product >>

Get Connected:
+91 79909 93062 | +91 63513 72032 | exports@jdmeditech.com

Vaginal Hysterectomy Surgery

A vaginal hysterectomy is one of the most preferred minimally invasive procedures in modern gynecology for the removal of the uterus. At JDMeditech, we support healthcare professionals with advanced surgical instruments and reliable medical devices that ensure safety, precision, and high-quality outcomes during gynecological procedures.
Vaginal hysterectomy offers faster recovery, minimal pain, and no visible scars, making it a popular choice for many women. Here is a complete guide to help patients and healthcare providers understand this procedure better.

What Is a Vaginal Hysterectomy?
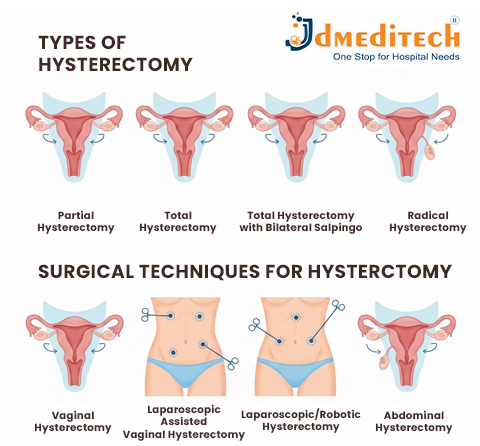
A vaginal hysterectomy involves removing the uterus (womb) through the vaginal canal. In some cases, the cervix, fallopian tubes, or ovaries may also be removed depending on the patient’s condition.
It is commonly recommended for women who do not plan future pregnancies and are suffering from chronic reproductive health issues that cannot be treated with medication or minimally invasive procedures.

When Is Vaginal Hysterectomy Recommended?
Doctors may suggest a vaginal hysterectomy for conditions such as
• Uterine fibroids
• Heavy or irregular menstrual bleeding
• Pelvic organ prolapse
• Endometriosis
• Chronic pelvic pain
• Adenomyosis
• Abnormal uterine bleeding
• Recurrent uterine infections

Advantages of Vaginal Hysterectomy
Vaginal hysterectomy provides several benefits for patients, including:
✔ No Visible Scars
The entire procedure is performed through the vagina, leaving no external marks.
✔ Faster Recovery
Most patients recover quicker compared to abdominal surgery.
✔ Less Postoperative Pain
Minimal tissue damage results in reduced pain and discomfort.
✔ Shorter Hospital Stay
Patients are usually discharged within 1–2 days.
✔ Lower Risk of Complications
Reduced chances of bleeding or infection.

Conclusion
Vaginal hysterectomy is a safe, efficient, and minimally invasive surgical technique that offers numerous benefits for women suffering from chronic gynecological issues. With the right technology and surgical instruments—such as those provided by JDMeditech—healthcare professionals can ensure optimal outcomes with enhanced safety and precision.

Explore More Product >>

Get Connected:
+91 79909 93062 | +91 63513 72032 | exports@jdmeditech.com

Labiaplasty Surgery

Labiaplasty is a surgical procedure that involves trimming or reshaping the labia minora to achieve a more balanced and comfortable vaginal structure. The goal of this surgery is not only aesthetic enhancement but also improved functionality in daily activities.
• Discomfort while walking, exercising, or wearing tight clothing
• Pain during intercourse
• Irritation or hygiene issues
• Asymmetry in the size or shape of the labia
• Desire for a more proportionate vaginal appearance

Who Can Benefit from Labiaplasty?
Labiaplasty is suitable for women experiencing:
• Enlarged or elongated labia due to genetics, childbirth, aging, or hormonal changes
• Functional discomfort during sexual intercourse or physical activities
• Emotional or psychological dissatisfaction with the appearance of their intimate area
A consultation with a qualified gynecologist or cosmetic surgeon helps determine whether the procedure is the right choice based on health history and expectations.

Benefits of Labiaplasty
• Enhanced comfort during activities like cycling, walking, or exercise
• Reduction of discomfort during sexual intercourse
• Improved intimate hygiene
• Boosted self-confidence and body image
• Correction of congenital or postpartum asymmetry

Recovery Tips
• Use cold compresses for swelling
• Avoid tight clothing during initial healing
• Maintain proper hygiene as instructed by the doctor
• Avoid sexual intercourse and strenuous exercise for 4–6 weeks
• Take prescribed medications for pain and inflammation

Risks & Considerations
• Swelling or bruising
• Temporary numbness
• Infection
• Scarring
• Asymmetry (rare and correctable)

Conclusion
Labiaplasty surgery offers a transformative solution for women seeking physical comfort, confidence, and improved intimate wellness. With the right guidance and expert care, patients can achieve natural-looking results and an enhanced quality of life.

Explore More Product >>

Get Connected:
+91 79909 93062 | +91 63513 72032 | exports@jdmeditech.com

Angioplasty Surgery

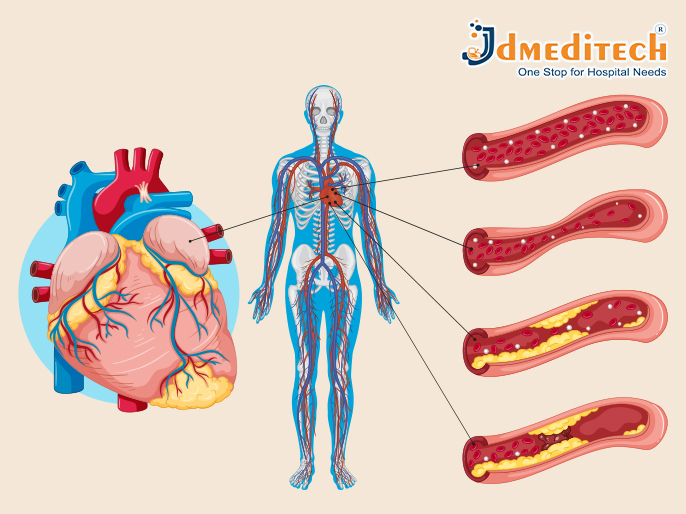
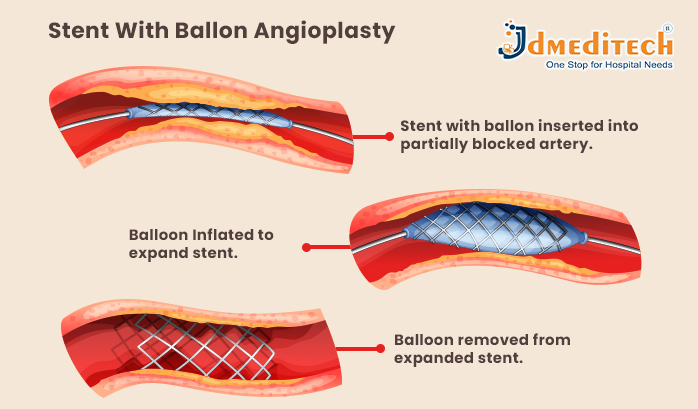
Angioplasty is a procedure in which a cardiologist inserts a small balloon inside a blocked artery. When the balloon is inflated, it pushes the plaque against the artery walls, widening the blood vessel. In many cases, a stent (a small metal mesh tube) is placed to keep the artery open permanently.

When Is Angioplasty Recommended?
Doctors may suggest angioplasty for patients experiencing:
• Coronary Artery Disease (CAD)
Plaque buildup narrows the arteries and reduces blood supply to the heart.
• Heart Attack
Angioplasty can quickly restore blood flow and reduce damage to the heart muscle.
• Severe Chest Pain (Angina)
Especially when pain does not improve with medication.
• Blockages Detected in Tests
Such as stress tests, CT scans, or angiograms.

How Angioplasty Is Performed
1. Preparation
• Local anesthesia is applied.
• A catheter is inserted through the groin or wrist.
• Using X-ray guidance, the catheter is moved toward the blocked artery.
2. Balloon Inflation
• A tiny balloon at the tip of the catheter is inflated.
• This compresses plaque and widens the artery.
3. Stent Placement
• A metal stent is placed in most cases.
• The stent stays in the artery to prevent re-narrowing.
4. Completion
• The catheter is removed.
• The entire procedure usually takes 30–60 minutes.

Benefits of Angioplasty
• Quickly restores blood flow
• Reduces chest pain
• Minimizes heart damage during a heart attack
• Shorter recovery time compared to open-heart surgery
• High success rate with stent placement

Risks and Complications
Although angioplasty is generally safe, some risks may include:
• Bleeding at the catheter insertion site
• Re-narrowing of the artery (restenosis)
• Blood clots in the stent
• Irregular heartbeats
• Rare chances of heart attack or stroke

Recovery After Angioplasty
Most patients recover quickly and may return home within a day. Recovery tips include:
• Avoid heavy lifting for a week
• Take prescribed blood-thinning medications
• Follow a heart-healthy diet
• Regular exercise as advised by the doctor
• Scheduled follow-ups to monitor progress
Lifestyle changes play a key role in preventing future blockages.

Conclusion
Angioplasty surgery is a safe, effective, and life-saving procedure for opening blocked arteries and improving heart function. With modern medical technology and expert cardiac care, patients can enjoy faster recovery and a healthier future. Understanding the procedure helps individuals make confident decisions about their heart health.

Explore More Product >>

Get Connected:
+91 79909 93062 | +91 63513 72032 | exports@jdmeditech.com
C-Section Surgery (Cesarean Delivery)

A Cesarean delivery, commonly known as a C-section, is a surgical procedure used to deliver a baby safely when vaginal birth is not possible or poses risks to the mother or child. Thanks to advanced medical equipment and modern surgical standards, C-sections today are highly safe and widely practiced around the world.

Why a C-Section Is Performed
Doctors may recommend a C-section for several medical reasons:

1. Complications During Labor
• Labor not progressing as expected
• Signs of fetal distress
• Issues with the umbilical cord
2. Maternal Health Concerns
• High blood pressure or pre-eclampsia
• Certain active infections
• Placenta previa (placenta covering or blocking the birth canal)
3. Baby’s Position
• Breech position (baby coming feet first)
• Transverse position (lying sideways)
4. Multiple Pregnancy
• Twins, triplets, or higher-order multiples
• Complications affecting one or more babies
5. Previous C-Sections
• Some women may require a repeat C-section depending on uterine healing and pregnancy conditions.

How C-Section Surgery Is Performed

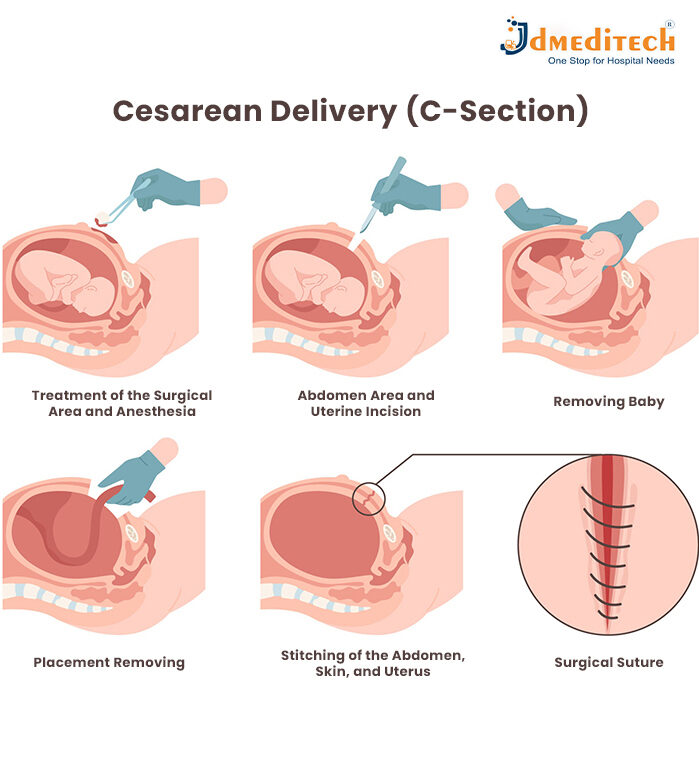
1. Preparation
• The mother receives spinal or epidural anesthesia.
• Vital signs are monitored, and the abdominal area is sterilized.
2. Making the Incision
• A horizontal (bikini line) incision is made on the lower abdomen.
• A second incision is created in the uterus to reach the baby.
3. Delivery of the Baby
• The baby is gently lifted out of the uterus.
• The umbilical cord is cut, and a pediatric team assesses the newborn.
4. Closing the Incisions
• The uterus and abdominal layers are carefully sutured.
• The entire operation typically takes about 40–60 minutes.

Recovery After a C-Section

Recovery from a C-section takes longer than a vaginal birth because it involves major abdominal surgery. Typical recovery steps include:
• Staying in the hospital for 2–4 days
• Pain management and adequate rest
• Avoiding lifting heavy objects
• Gentle walking to improve circulation
• Scheduling follow-up visits to monitor incision healing
Most mothers recover fully within 4–6 weeks.

Benefits of a C-Section
• A safer option in emergency situations
• Protects the health of both mother and baby in high-risk pregnancies
• Planned C-Sections allow scheduling convenience for families

Risks and Considerations
As with any surgical procedure, a C-section carries some risks, such as:
• Infection or excessive bleeding
• Blood clots
• Longer healing period
• Increased risk of breathing problems in babies delivered before 39 weeks (when not medically necessary)
Healthcare professionals evaluate each case carefully before recommending cesarean delivery.

Conclusion
A C-section is a highly effective and reliable method of childbirth when normal delivery isn’t possible or safe. With advanced surgical techniques, professional medical care, and high-quality equipment—such as those supported by JD Meditech—mothers and babies can expect safe outcomes and a smooth recovery.
Understanding the procedure empowers parents, reduces anxiety, and prepares families for a confident birthing experience.

Explore More Product >>

Get Connected:
+91 79909 93062 | +91 63513 72032 | exports@jdmeditech.com
Instruments Used in TURBT (Transurethral Resection of Bladder Tumor) Surgery

During TURBT (Transurethral Resection of Bladder Tumor), a specialized set of urological instruments is used to access and remove bladder tumors via the urethra—without external incisions.

Instrument Names Used in TURBT Surgery:
Resectoscope
Working Element (active part of resectoscope)
Cutting Loop Electrode (monopolar or bipolar)
Light Cable and Camera Head
Irrigation Tubing Set
Saline or Glycine Irrigation Fluid
Ellik Evacuator or Toomey Syringe
Cautery Electrode / Coagulation Electrode
Bladder Distension Sheath
Biopsy Forceps (if tissue sampling is needed)
Electrosurgical Generator Unit (ESU)
e.g., Bipolar Saline Electrosurgical Unit – 400W
Suction Tubing and Collection Canister
Operating Table with Leg Supports (Lithotomy Position)

These instruments work together to perform the resection and removal of bladder tumors through the urethra, without open surgery.

TURBT (Transurethral Resection of Bladder Tumor): Procedure, Benefits & Recovery

TURBT (Transurethral Resection of Bladder Tumor) is typically needed when a person is suspected to have or has been diagnosed with a bladder tumor, especially at early stages. It plays a crucial role in both diagnosis and initial treatment.

We need TURBT (Transurethral Resection of Bladder Tumor) in the following situations:
1. Diagnosis of Bladder Cancer
When a person has symptoms like:
Blood in urine (hematuria)
Frequent or painful urination
Imaging or cystoscopy shows a suspicious mass or lesion in the bladder.
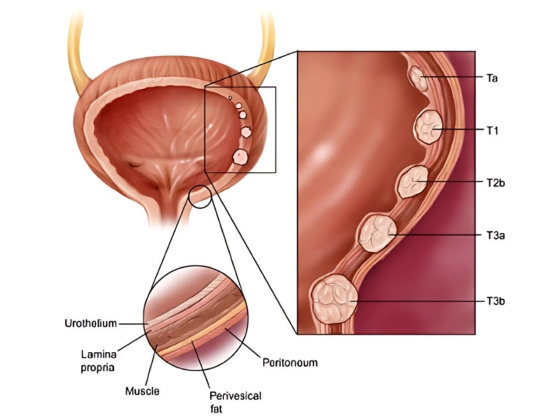
TURBT helps confirm if the tumor is cancerous, and determines the type, grade, and depth of invasion.

2. Initial Treatment of Early-Stage Bladder Cancer
Especially for non-muscle invasive bladder cancer (NMIBC):
Ta (confined to bladder lining)
T1 (into connective tissue)
CIS (flat carcinoma in situ)
TURBT removes the tumor completely, often followed by intravesical therapy (e.g. BCG).

3. Restaging or Repeat TURBT
If the initial tumor is:
High-grade
T1 stage
A second TURBT (within 2–6 weeks) is often done to ensure complete removal and accurate staging.

4. Relief of Urinary Symptoms in Advanced Cancer
When the tumor causes:
Bleeding
Blockage of urine flow
TURBT may be done for palliative purposes, not cure.

Procedure of TURBT (Transurethral Resection of Bladder Tumor)
1. Preoperative Preparation
Admission: Usually done as a day-care or short hospital stay.
Anesthesia: Spinal or general anesthesia is administered.
Positioning: Patient lies on their back with legs supported in stirrups (lithotomy position).

2. Insertion of the Resectoscope
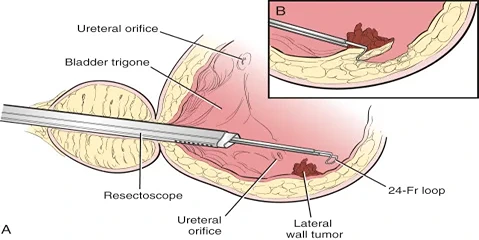
A resectoscope (a thin tube with a camera and surgical loop) is gently inserted through the urethra into the bladder.
No external incision is made.

3. Visual Inspection of the Bladder
The surgeon examines the inside of the bladder for:
Tumor(s) — their size, location, and number
Bladder wall condition
Any suspicious areas for biopsy

4. Tumor Resection
The tumor is shaved off in layers using the resectoscope’s electric loop.
If necessary, tissue from the base of the tumor (including muscle layer) is also taken to check how deep the tumor has grown.
5. Control of Bleeding (Hemostasis)
The surgical area is cauterized to stop bleeding.
Irrigation fluid is used to flush out blood clots and tissue pieces from the bladder.
6. Tissue Collection for Biopsy
Tumor and bladder wall tissue samples are collected and sent for pathological analysis to determine:
Cancer presence
Type, grade, and stage

7. Catheter Placement
A Foley catheter is inserted into the bladder to:
Drain urine
Prevent blockage from clots
Allow bladder to heal
Bladder irrigation may be used to prevent clot formation.

Postoperative Care
Hospital Stay: Usually 1–2 days depending on recovery.
Catheter Removal: Within 24–72 hours typically.
Pathology Report: Usually ready within 7–10 days to guide further treatment.

Duration of Procedure
Typically takes 30–90 minutes depending on the number and size of tumors.

Instruments Used in Bladder Augmentation Surgery: Step-by-Step Guide

During Bladder Augmentation Surgery, various surgical instruments are used to perform the procedure efficiently and safely. Here’s a list of common instruments:

step-by-step list of instruments

1. Preparation Phase:
Surgical Scalpels: For making the initial incision in the abdominal area.
Needle Holder: To securely hold needles for suturing.

2. Accessing the Bladder:
Surgical Scissors: To dissect and open up layers of tissue to reach the bladder.
Bladder Retractors: Used to hold the bladder open for better access.

3. Harvesting Intestinal Tissue:
Intestinal Forceps: To clamp and hold the intestinal segment to be used for augmentation.
Bowel Clamp: To temporarily stop the blood flow to the portion of the intestine being removed.
Scissors or Electrocautery: To cut the section of the intestine.

4. Preparing and Attaching Intestinal Tissue to the Bladder:
Needle Holder and Suturing Instruments: For stitching the harvested segment of intestine to the bladder.
Surgical Scissors: For trimming any excess tissue.
Electrocautery (Diathermy): For coagulating small blood vessels to minimize bleeding.

5. Closing the Incision:
Sutures (Absorbable or Non-absorbable): To close the abdominal and bladder incisions.
Staplers: Occasionally used for closing the larger incisions in the bladder or abdominal wall.

6. Post-Operative Care:
Catheters: A catheter is inserted into the bladder for draining urine during recovery.
Drainage Tubes: May be used to prevent fluid buildup after surgery.

7. Final Inspection and Closure:
Sterile Drapes and Covers: To ensure a sterile environment during surgery.
Sutures or Staplers: To close the abdominal incision.

These instruments work together to ensure that the bladder augmentation procedure is successful and safe.

Bladder Augmentation Surgery: Procedure, Benefits & Recovery Guide

Bladder Augmentation is needed when the bladder is too small, stiff, or unable to store urine properly, causing serious problems.

Bladder Augmentation is needed when:
Bladder cannot hold enough urine (small bladder capacity).
Bladder is too stiff or high-pressure, risking kidney damage.
Severe urinary incontinence that doesn’t improve with medication or catheter use.
Neurogenic bladder (due to spinal cord injury, spina bifida, etc.).
Congenital bladder problems like bladder exstrophy or other birth defects.
Chronic bladder inflammation or damage from radiation, infection, or long-term catheter use.
Urine backing up to kidneys (vesicoureteral reflux) due to poor bladder function.

Procedure of Bladder Augmentation (Augmentation Cystoplasty)

1. Anesthesia
The patient is placed under general anesthesia (completely unconscious).

2. Opening the Abdomen
A surgical incision is made in the lower abdomen to access the bladder.

3. Opening the Bladder
The surgeon cuts open the bladder at the top to prepare it for expansion.

4. Removing a Section of Intestine
A small piece of intestine (usually ileum) is removed.
The intestine is then reconnected so digestion continues normally.

5. Attaching Intestine to Bladder
The intestinal segment is reshaped and sewn to the bladder to increase its size and reduce pressure.

6. Closing the Incision
A catheter is placed into the bladder to drain urine.
The abdominal incision is closed with stitches.

7. Post-Surgery Recovery
Hospital stay: 7–10 days.
Catheter use: 2–3 weeks.
Patient may need to learn self-catheterization for bladder emptying.

Benefits
Increased bladder capacity – can hold more urine comfortably.
Reduced bladder pressure – protects the kidneys from damage.
Improved continence – helps control urine leakage.
Better quality of life – less urgency, fewer infections, and more independence.

Instruments Used in Cystectomy Surgery: A Complete Guide

Here is a list of specific instruments used in cystectomy surgery (bladder removal surgery):

Basic Surgical Instruments:
Scalpel – For making precise incisions in the skin and tissues.
Mayo scissors – For cutting soft tissues during dissection.
Metzenbaum scissors – For finer dissection of delicate tissues.
Needle holder – Used to hold needles while suturing.
Kelly clamp – For clamping blood vessels and tissues to control bleeding.
Mosquito clamp – A smaller version of the Kelly clamp, used for smaller blood vessels.

Instruments for Bladder and Pelvic Surgery:
Balfour retractor – A self-retaining retractor to hold the abdominal cavity open for better access.
DeBakey forceps – For grasping tissues delicately, used to hold and manipulate tissues.
Allis forceps – Used to grasp tissues, especially in deeper regions.
Surgical suction – Used to remove blood and fluids, maintaining a clear surgical field.
Electrocautery (Bovie) – An electrical tool used to cut tissue and coagulate blood vessels to minimize bleeding.
Bladder dissector – To carefully separate the bladder from surrounding tissues.

Laparoscopic or Robotic-Assisted Instruments (if minimally invasive):
Trocars – Tubes inserted into the abdomen to create access points for laparoscopic instruments.
Laparoscope – A small camera inserted through a trocar to view the internal surgical site.
Graspers – Instruments used for holding and manipulating tissues during laparoscopic surgery.
Laparoscopic scissors – Special scissors for cutting tissues during minimally invasive surgery.
Endoscopic stapler – Used for stapling tissues together, often in laparoscopic procedures.

Urinary Diversion Instruments:
Bowel clamps – Used to isolate portions of the bowel for creating urinary diversions, such as an ileal conduit.
Catheters – Used for draining urine during the procedure and post-surgery.
Stents – Tubes used to keep the urinary system open after surgery.
Staplers – Used in creating an ileal conduit or a neobladder.
Stoma measuring device – To measure and create a proper site for the urinary diversion.

Closure Instruments:
Sutures – To close incisions after the procedure.
Staples – Used to close larger incisions or areas that require quicker closure.

These instruments are used to carry out different stages of the cystectomy procedure, including bladder removal, tissue dissection, and urinary diversion creation.

Cystectomy Surgery: Procedure, Types, Recovery & Risks Explained

A cystectomy is a surgical procedure to remove all or part of the urinary bladder. It is most commonly performed to treat bladder cancer, but it may also be done for other conditions like chronic bladder inflammation, severe trauma, or congenital defects.

Types of Cystectomy:
Partial Cystectomy – Only a part of the bladder is removed (usually if cancer is small and localized).
Radical Cystectomy – The entire bladder is removed.
Bladder Cancer (most common reason)
Especially if it is muscle-invasive or high-grade and does not respond to treatments like chemotherapy or BCG.
Severe Bladder Damage
From trauma, radiation therapy, or chronic inflammation.
Painful Bladder Conditions
Such as interstitial cystitis that does not respond to other treatments.
Birth Defects
Rarely, if the bladder is malformed and non-functional.
Neurological Bladder Dysfunction
In very severe cases where the bladder cannot empty or store urine properly, and other treatments fail.

Step-by-Step Cystectomy Procedure
1. Pre-operative Preparation
Medical tests: Blood work, urine tests, imaging (CT/MRI), EKG.
Bowel prep: Cleansing of the intestines if a urinary diversion will involve the bowel.
Fasting: No food or drink for several hours before surgery.
Consent: Patient is informed and signs surgical consent.

2. Anesthesia
General anesthesia is administered — the patient is fully unconscious and pain-free.

3. Positioning and Sterile Prep
The patient is positioned on the operating table.
The abdomen is cleaned and sterilized to prevent infection.

4. Surgical Incision
Open surgery: A vertical incision is made in the lower abdomen.
Minimally invasive (laparoscopic/robotic): Several small incisions are made for camera and tools.

5. Removal of the Bladder and Nearby Organs
The bladder is carefully detached from surrounding tissues.
In men: Bladder + prostate + seminal vesicles are removed

In women: Bladder + uterus + part of vagina + ovaries (sometimes) are removed.

6. Lymph Node Dissection
Pelvic lymph nodes are removed and sent for testing to check for cancer spread.

7. Urinary Diversion Construction

Since the bladder is gone, a new pathway for urine is created:
Ileal conduit: A piece of small intestine is used to connect ureters to a stoma (urine collects in a bag).
Neobladder: A new bladder made from intestine, connected to the urethra (you can urinate normally).
Continent reservoir: A pouch is created inside the body and emptied using a catheter.

8. Closure
All internal structures are checked for leaks.
Drains and catheters are placed.
The incision is closed with sutures or staples.

9. Recovery in Hospital
ICU or recovery room monitoring.
Pain control, IV fluids, and gradual reintroduction of diet.
Patient learns to manage urine diversion (if needed).
Hospital stay: usually 5–10 days.

Instruments in Shock Wave Lithotripsy (SWL) for Kidney Stones

The main instrument used in SWL is the lithotripter — a specialized medical device designed to generate and focus shock waves to break kidney or ureteral stones.

Step-by-Step Instruments Used in Shock Wave Lithotripsy (SWL)

1. Pre-Procedure Stage
Patient Evaluation – Ultrasound Machine | X-ray/CT Scanner – To locate the stone and assess size/location
Vital Monitoring – BP Monitor | ECG Monitor – To monitor heart rate, oxygen, blood pressure
Sedation (if required) – IV line, syringes, anesthetic setup – For patient comfort and pain control

2. Positioning and Preparation
Positioning Patient – Adjustable SWL Table – To properly align the patient with the machine
Shock Transmission Medium – Water cushion, gel pad, or water bath – Helps conduct shock waves to the body

3. Lithotripsy Procedure
Stone Localization – Fluoroscopy or Ultrasound Guidance – Real-time targeting of the stone
Shock Wave Delivery – Lithotripter Machine – Generates and focuses shock waves on stone

Types of Lithotripters:
Electrohydraulic Lithotripter
Electromagnetic Lithotripter
Piezoelectric Lithotripter

4. Post-Procedure Monitoring
Vital Sign Monitoring – ECG, Pulse Oximeter, BP Monitor – To check patient stability after treatment
Urine Output Observation – Urine collection system, Urinometer – To detect stone fragments and urine flow
Follow-Up Imaging – Ultrasound or X-ray – To confirm stone clearance

Shock Wave Lithotripsy (SWL): Guide to Procedure & Recovery

Shock Wave Lithotripsy (SWL) is a non-invasive medical procedure used to break kidney or ureteral stones into smaller pieces using high-energy sound waves (shock waves). These small fragments can then pass naturally through the urinary tract

You may need SWL if

You have kidney stones or ureter stones between 4 mm to 20 mm.
The stone is visible on X-ray or ultrasound.
The stone is in the kidney or upper ureter.
You have pain, bleeding, or infection due to stones.
You want to avoid surgery.
Other treatments (like medications) did not work.

Here is a step-by-step explanation of how Shock Wave Lithotripsy (SWL) is performed

1. Pre-Procedure Preparation
Medical Evaluation – Imaging tests (X-ray, CT scan, or ultrasound) are done to locate the stone and determine its size and position.
Fasting – You may be asked to avoid food and drink for 6–8 hours before the procedure.
Medication Review – Blood thinners or certain medications may be stopped temporarily.
Anesthesia – Light sedation or general anesthesia may be used to reduce pain or movement during the procedure.

2. During the Procedure

Positioning – You lie on a water-filled cushion or a special table, depending on the machine used.
Imaging Guidance – The doctor uses X-ray or ultrasound to target the stone accurately.
Shock Wave Delivery – A lithotripter machine generates high-energy sound waves focused on the stone.
Stone Fragmentation – The shock waves pass through the skin and break the stone into small fragments.
Duration – The procedure typically lasts 30 to 60 minutes.

3. Post-Procedure Care
Observation – You may be monitored for a few hours and discharged the same day.
Symptoms – Mild pain, blood in urine, or bruising at the skin site is common.
Hydration – You are advised to drink plenty of fluids to flush out stone fragments.
Medications – Pain relievers and sometimes antibiotics are prescribed.
Follow-up – Imaging is done after a few weeks to ensure the stone is cleared completely.

You may pass stone fragments over several days to weeks.
Some patients may need repeat SWL sessions if stones are not completely broken.
If SWL fails, other options like URS (ureteroscopy) or PCNL may be considered.

Key Instruments in Ureteroscopy (URS) for Effective Treatment

Ureteroscopy (URS) is a minimally invasive urological procedure used to diagnose and treat conditions of the ureter and kidney, such as stones, tumors, or strictures. It involves the insertion of a ureteroscope (a thin, flexible or rigid scope) through the urethra and bladder into the ureter.

Here is a list of instrument names used in Ureteroscopy (URS):

1. Ureteroscope
Types:
Rigid ureteroscope – for lower ureter.
Flexible ureteroscope – for upper ureter and kidney.
Semi-rigid ureteroscope – for mid-ureter and some upper ureter access.
Allows visualization and access to the ureter and renal pelvis.

2. Guidewires
Hydrophilic Guidewire – for easy ureteral navigation.
Zebra Wire / Amplatz Wire – for support and safety.
PTFE Guide Wire – To safely access and guide instruments into the ureter.
Fluoroscopy – confirms stent position.

3. Access Sheaths
Ureteral Access Sheath (UAS) – facilitates repeated passage of instruments, reduces intrarenal pressure, and protects the ureter.
URS Forceps – To grasp and retrieve stones or tissue samples.
Bugbee Electrode – For cauterization and tumor ablation during URS.

4. Irrigation System
Maintains clear vision by flushing the field.
Manual syringe or pressurized bag system.

5. Stone Retrieval Devices
Stone retrieval baskets (Nitinol / Stainless) – To capture and remove stone fragments from the ureter/kidney.
Grasping Forceps – to retrieve stones or tissue.

6. Lithotripsy Devices (for stone fragmentation)
Holmium:YAG Laser – most commonly used.
Ultrasonic lithotripter
Pneumatic lithotripter

7. Dilators and Catheters
Ureteral Dilators or metal dilators – to widen the ureteral orifice.
Balloon Dilators – for precise dilation.

8. Stents and Tubes
Double-J (DJ) Stents – placed post-procedure to prevent obstruction and promote healing.
Ureteral Catheters – for dye injection or drainage.

9. Contrast Media and Monitoring Tools
Ureteroscope withdrawal – under vision to avoid trauma.
C-arm Fluoroscopy Unit – real-time X-ray guidance.
LED Light Source – Provides bright illumination for endoscopic visualization.
Fiber Optic Cable – Transmits light from the LED source to the ureteroscope.

Ureteroscopy (URS) Procedure: Steps, Benefits, and Recovery

Ureteroscopy (URS) is needed when there are issues in the ureters or kidneys, such as:

Kidney or Ureteral Stones: Large stones causing pain or blockage.
Obstructions: Blockages in the ureter due to stones, scarring, or strictures
Tumors: Suspicion of tumors in the urinary tract.
Hematuria: Unexplained blood in the urine.
Strictures: Narrowing of the ureter affecting urine flow.
Chronic or Recurrent Infections: Due to underlying stones or blockages.
Post-Surgical Follow-Up: After stone removal or other treatments.

It’s used to remove stones, clear obstructions, or diagnose and treat urinary tract problems.

Here’s a short step-by-step procedure for Ureteroscopy (URS):

1. Preparation:
Anesthesia: Local or general anesthesia is given.
Fasting: You may be instructed to avoid eating or drinking before the procedure.
IV Line: For fluids or medications.

2. Positioning:
You lie on your back with legs slightly spread.
The area is sterilized.

3. Insertion of Cystoscope:
A thin tube (cystoscope) is inserted through the urethra into the bladder.

4. Insertion of Ureteroscope:
A ureteroscope is inserted through the cystoscope into the ureter and possibly the kidneys for examination.

5. Examination & Diagnosis:
The doctor checks for stones, blockages, tumors, or strictures in the urinary tract.

6. Treatment (if necessary):
Stones are removed or broken up with a laser.
Tumors may be biopsied or removed.
A stent may be placed if needed to keep the ureter open.

7. Completion:
The ureteroscope and instruments are removed.
If a stent was placed, it may remain for a few days to a few weeks.

8. Recovery:
The procedure typically lasts 30-60 minutes.
You can usually go home the same day and resume normal activities in a few days.

Benefits of Ureteroscopy (URS)
Minimally invasive (no cuts)
Effectively removes kidney/ureteral stones
Quick recovery time
Usually done as a day procedure
Accurate diagnosis and treatment
Safe with low complication risk

Instruments Used in Percutaneous Nephrolithotomy(PCNL) Surgery

Percutaneous Nephrolithotomy (PCNL) surgery — a procedure used to remove large or complex kidney stones — several specialized surgical instruments and equipment are used.

Key Equipment Used in PCNL Surgery:

Fluoroscopy or Ultrasound Machine
For real-time imaging to guide the surgeon during the procedure.

Nephrostomy Needle (e.g., Chiba needle)
Used to puncture the kidney through the skin and access the collecting system.

Guidewire (e.g., Zebra wire, J-tip wire)
A flexible wire placed through the needle to maintain access to the kidney.

Dilators (serial or balloon dilators / Fascial Dilators / Metal or Plastic Serial Dilators)
Used to widen the tract from the skin to the kidney, allowing for instrument passage.

Amplatz Sheath (Working Sheath)
A hollow tube that provides a working channel to the kidney for instruments.

Nephroscope (Rigid or Flexible)
A rigid endoscope designed to visualize and access stones inside the kidney.

Stone Fragmentation Devices (Lithotripters)
Ultrasonic Lithotripter – Uses sound waves to break stones.
Pneumatic Lithotripter – Uses compressed air to hammer and break stones.
Laser Lithotripter (Holmium:YAG laser) – Precise stone fragmentation using laser energy.

Stone Retrieval Forceps or Baskets
Stone Graspers / Forceps – For grabbing and extracting stone fragments.
Stone Retrieval Basket – For collecting and removing stone pieces.

Irrigation System
Provides continuous saline flow to keep the field clear.

Nephrostomy Tube (post-op)
Temporarily placed to drain urine and allow healing after the procedure.

Ureteral Stent (Double J stent)
Keeps ureter open and ensures urine flow during healing.

Suction System
Helps remove stone debris and fluid during the procedure.

PCNL Surgery: Safe Kidney Stone Removal Procedure

Percutaneous Nephrolithotomy (PCNL) is a minimally invasive kidney surgery to remove large or complex kidney stones directly from the kidney through a small cut in the back.

When is PCNL recommended?
Kidney stones larger than 2 cm
Stones that don’t respond to other treatments
Staghorn calculi (complex, branching stones)
Multiple or hard stones

Step-by-Step Procedure:
1. Pre-Operative Preparation
Pre-Surgical Evaluation:
Imaging tests like CT scan, ultrasound, or X-ray are done to assess stone size, location, and type.
Blood tests and other health evaluations are done to ensure you’re fit for surgery.

Anesthesia:
The patient is given general anesthesia, which means you will be asleep and pain-free during the surgery.

Positioning:
The patient is placed in a prone position (lying on the stomach) to allow access to the back.

2. Accessing the Kidney
Locating the Stone:
Using ultrasound or fluoroscopy (X-ray), the surgeon locates the stone and marks the best entry point.

Making a Small Incision:
A small 1 cm incision is made in the flank area (the side of the body), usually in the lower back.

Inserting the Needle:
A thin needle is inserted through the incision into the kidney under imaging guidance.
The needle allows access to the renal pelvis, where the stones are located.

3. Creating a Pathway to the Kidney
Guidewire Insertion:
Once the needle is in the kidney, a guidewire is threaded through the needle into the kidney.
This guidewire provides a secure path for the rest of the instruments.

Dilation of the Track:
The opening created by the needle is gradually expanded using dilators.
Dilators are progressively larger tubes used to widen the track from the skin to the kidney, ensuring there’s enough space to pass instruments safely.

4. Inserting the Amplatz Sheath
A hollow tube (Amplatz sheath) is inserted into the expanded tract to maintain the pathway open during the procedure.
The sheath allows the surgeon to pass various tools into the kidney while keeping the tract safe and stable.

5. Removing the Stones
Nephroscope Insertion:
A nephroscope (a small, flexible camera) is inserted through the sheath to allow the surgeon to see inside the kidney and locate the stones.

Breaking the Stones:
The stones are broken into smaller fragments using ultrasonic, laser, or pneumatic energy.
Laser lithotripsy is commonly used for stone fragmentation.

Removing the Stones:
The stone fragments are removed using specialized tools that grab and pull out the pieces.

6. Drainage and Closing
Nephrostomy Tube:
A temporary nephrostomy tube (a small drainage tube) may be placed in the kidney to allow urine to drain and prevent swelling or infection.

Closing the Incision:
After all the stones are removed, the incision is closed with a few sutures.
A sterile dressing is applied to cover the incision site.

7. Post-Surgery Care
Recovery and Monitoring:
The patient is monitored in the recovery room for a few hours.
Most patients stay in the hospital for 1–2 days to ensure there are no immediate complications.

Nephrostomy Tube Care:
If a nephrostomy tube was placed, it is usually removed after a few days or once healing is confirmed.

Follow-Up Imaging:
Imaging tests may be performed to ensure the stones have been completely removed and to monitor the healing process.

Post-Operative Recovery
Pain Management:
Mild pain is common after the procedure, but medications will be provided to manage it.

Activity and Diet:
Most patients can resume normal activities in about 1–2 weeks.
A healthy diet and hydration are recommended to help with healing.

Advantages of PCNL
Minimally invasive with only a small incision.
High success rate in removing large or complex stones.
Faster recovery compared to open surgery.

Instruments Used in Pyeloplasty Surgery

Pyeloplasty surgery—a procedure to correct a blockage or narrowing at the junction between the kidney and the ureter (ureteropelvic junction or UPJ)—the surgical instruments used vary depending on whether the surgery is done through open, laparoscopic, or robot-assisted techniques. Here’s a breakdown of commonly used instruments:

1. General Surgical Instruments (for all approaches):
Scalpel – for making initial incisions.
Scissors (Metzenbaum or Mayo) – for cutting tissue.
Forceps (Debakey, Adson) – for handling tissues.
Needle holders – for suturing.
Hemostats (Mosquito, Kelly) – for clamping blood vessels.
Suction tip (Yankauer or Frazier) – for clearing blood and fluid.

2. Laparoscopic Pyeloplasty Instruments:
Trocars and Cannulas – for inserting instruments through small incisions.
Laparoscope – camera to view the surgical field.
Graspers – to hold and manipulate tissues.
Laparoscopic scissors – to dissect and cut.
Hook or spatula cautery – for precise electrocautery dissection.
Suturing devices or needle drivers – for intracorporeal suturing.
Suction-irrigation device – for cleaning the surgical area.

3. Robot-Assisted (Da Vinci) Pyeloplasty:
Robotic arms and instruments – such as:
Maryland bipolar forceps
Monopolar curved scissors
Prograsp forceps
Needle drivers
3D camera system – high-definition visualization.
Assistant port instruments – similar to laparoscopic tools for suction, clipping, or retraction.

In a pyeloplasty surgery, several consumable products are used depending on the surgical approach (open, laparoscopic, or robotic). These are items that are used up during the procedure and cannot be reused. Here’s a comprehensive list categorized by their purpose:

1. Anesthesia & IV Supplies:
IV cannulas and sets
Syringes and needles
Anesthetic drugs – e.g., Propofol, Fentanyl, Muscle relaxants.
Local anesthetic (e.g., Bupivacaine) – for postoperative pain control.

2. Surgical Field & Access:
Suction canisters and tubing
Laparoscopic ports/trocars (if laparoscopic or robotic approach)
CO₂ insufflation tubing – for creating pneumoperitoneum.

3. Sutures & Hemostasis:
Absorbable sutures (e.g., Vicryl, PDS) – for internal anastomosis.
Non-absorbable sutures (e.g., Prolene) – sometimes used for skin.
Electrocautery pads and cables

4. Drainage & Stenting:
Double-J (DJ) stent – to keep the ureter open during healing.
Foley catheter – for bladder drainage.
Surgical drain (e.g., Jackson-Pratt or Penrose) – sometimes placed to prevent fluid accumulation.

5. Post-op Dressings:
Adhesive dressings (e.g., Tegaderm, Opsite)
Sterile bandages and tape
Antibiotic ointment

Optional (depending on case and approach):
Staples or skin closure strips – sometimes used in open procedures.
Specimen bag – if tissue is removed during the procedure.

Pyeloplasty Surgery: Procedure, Recovery, and Benefits Explained

Pyeloplasty is needed when there is a blockage or narrowing at the junction where the kidney meets the ureter, called the ureteropelvic junction (UPJ). This condition is known as UPJ obstruction. It prevents normal urine flow from the kidney to the bladder and can cause swelling of the kidney (hydronephrosis).

You may need a pyeloplasty if you have symptoms like:
Flank or back pain
Recurrent urinary tract infections
Kidney stones
Blood in the urine
Decreased kidney function

It’s usually done to relieve the blockage, preserve kidney function, and prevent further damage.

1: Anesthesia

You are given general anesthesia to make you sleep and feel no pain during the operation.
2: Making Incisions
The surgeon makes either:
A large incision (open surgery), or
Several small incisions (laparoscopic or robotic surgery) on the side of your abdomen.

3: Finding the Problem
The surgeon carefully finds the blocked or narrowed part at the ureteropelvic junction (UPJ).

4: Removing the Blockage
The damaged or scarred part of the ureter causing the blockage is cut out and removed.

5: Reconnecting the Ureter
The healthy ureter is then stitched (sutured) back to the kidney’s renal pelvis in a way that widens the passage for urine to flow easily.

6: Inserting a Stent
A small internal stent (tube) is placed inside the ureter to keep it open and help it heal properly.

7: Closing the Incisions
The incisions are closed with stitches or surgical glue.

8: Recovery
You are moved to the recovery room and monitored as you wake up.
The stent usually stays in place for 4 to 6 weeks, then is removed with a simple procedure later.

There are mainly three types of pyeloplasty:
Open pyeloplasty (traditional way, bigger cut)
Laparoscopic pyeloplasty (small cuts, quicker recovery)
Robotic-assisted pyeloplasty (done using robotic arms for more precision)
Recovery usually takes a few weeks, and success rates are very high! 🌟

Benefits of pyeloplasty surgery:

Restores Normal Urine Flow
Removes the blockage at the ureteropelvic junction (UPJ), allowing urine to drain freely from the kidney to the bladder.

Relieves Pain
Reduces or eliminates flank, back, or abdominal pain caused by the obstruction.

Protects Kidney Function
Prevents long-term kidney damage, hydronephrosis (kidney swelling), and loss of kidney function.

Decreases Risk of Infections
Reduces the chances of repeated urinary tract infections (UTIs) caused by stagnant urine.

Lowers the Risk of Kidney Stones
Proper urine drainage helps prevent the formation of kidney stones.

High Success Rate
Pyeloplasty has a very high success rate (over 90%) with long-lasting results.

Minimally Invasive Options Available
Laparoscopic and robotic pyeloplasty offer faster recovery, less pain, and smaller scars compared to open surgery.