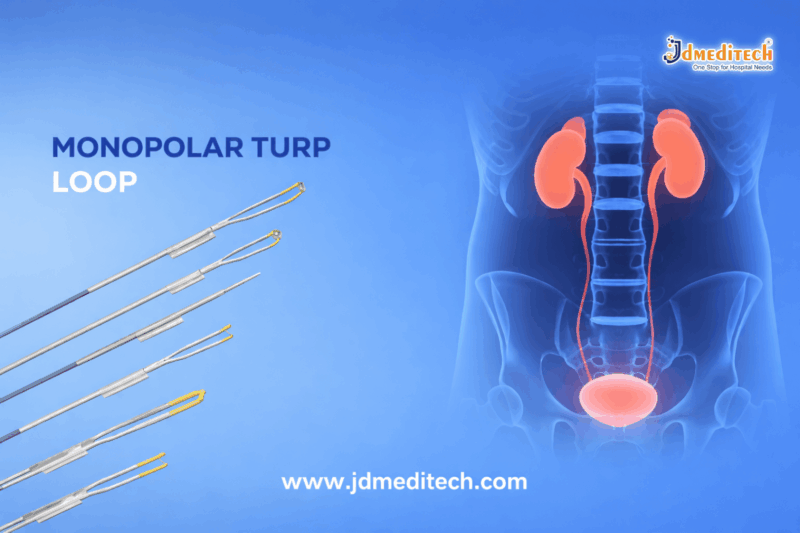
Labiaplasty Surgery

Labiaplasty is a surgical procedure that involves trimming or reshaping the labia minora to achieve a more balanced and comfortable vaginal structure. The goal of this surgery is not only aesthetic enhancement but also improved functionality in daily activities.
• Discomfort while walking, exercising, or wearing tight clothing
• Pain during intercourse
• Irritation or hygiene issues
• Asymmetry in the size or shape of the labia
• Desire for a more proportionate vaginal appearance

Who Can Benefit from Labiaplasty?
Labiaplasty is suitable for women experiencing:
• Enlarged or elongated labia due to genetics, childbirth, aging, or hormonal changes
• Functional discomfort during sexual intercourse or physical activities
• Emotional or psychological dissatisfaction with the appearance of their intimate area
A consultation with a qualified gynecologist or cosmetic surgeon helps determine whether the procedure is the right choice based on health history and expectations.

Benefits of Labiaplasty
• Enhanced comfort during activities like cycling, walking, or exercise
• Reduction of discomfort during sexual intercourse
• Improved intimate hygiene
• Boosted self-confidence and body image
• Correction of congenital or postpartum asymmetry

Recovery Tips
• Use cold compresses for swelling
• Avoid tight clothing during initial healing
• Maintain proper hygiene as instructed by the doctor
• Avoid sexual intercourse and strenuous exercise for 4–6 weeks
• Take prescribed medications for pain and inflammation

Risks & Considerations
• Swelling or bruising
• Temporary numbness
• Infection
• Scarring
• Asymmetry (rare and correctable)

Conclusion
Labiaplasty surgery offers a transformative solution for women seeking physical comfort, confidence, and improved intimate wellness. With the right guidance and expert care, patients can achieve natural-looking results and an enhanced quality of life.

Explore More Product >>

Get Connected:
+91 79909 93062 | +91 63513 72032 | exports@jdmeditech.com

Angioplasty Surgery

Angioplasty is a procedure in which a cardiologist inserts a small balloon inside a blocked artery. When the balloon is inflated, it pushes the plaque against the artery walls, widening the blood vessel. In many cases, a stent (a small metal mesh tube) is placed to keep the artery open permanently.

When Is Angioplasty Recommended?
Doctors may suggest angioplasty for patients experiencing:
• Coronary Artery Disease (CAD)
Plaque buildup narrows the arteries and reduces blood supply to the heart.
• Heart Attack
Angioplasty can quickly restore blood flow and reduce damage to the heart muscle.
• Severe Chest Pain (Angina)
Especially when pain does not improve with medication.
• Blockages Detected in Tests
Such as stress tests, CT scans, or angiograms.

How Angioplasty Is Performed
1. Preparation
• Local anesthesia is applied.
• A catheter is inserted through the groin or wrist.
• Using X-ray guidance, the catheter is moved toward the blocked artery.
2. Balloon Inflation
• A tiny balloon at the tip of the catheter is inflated.
• This compresses plaque and widens the artery.
3. Stent Placement
• A metal stent is placed in most cases.
• The stent stays in the artery to prevent re-narrowing.
4. Completion
• The catheter is removed.
• The entire procedure usually takes 30–60 minutes.

Benefits of Angioplasty
• Quickly restores blood flow
• Reduces chest pain
• Minimizes heart damage during a heart attack
• Shorter recovery time compared to open-heart surgery
• High success rate with stent placement

Risks and Complications
Although angioplasty is generally safe, some risks may include:
• Bleeding at the catheter insertion site
• Re-narrowing of the artery (restenosis)
• Blood clots in the stent
• Irregular heartbeats
• Rare chances of heart attack or stroke

Recovery After Angioplasty
Most patients recover quickly and may return home within a day. Recovery tips include:
• Avoid heavy lifting for a week
• Take prescribed blood-thinning medications
• Follow a heart-healthy diet
• Regular exercise as advised by the doctor
• Scheduled follow-ups to monitor progress
Lifestyle changes play a key role in preventing future blockages.

Conclusion
Angioplasty surgery is a safe, effective, and life-saving procedure for opening blocked arteries and improving heart function. With modern medical technology and expert cardiac care, patients can enjoy faster recovery and a healthier future. Understanding the procedure helps individuals make confident decisions about their heart health.

Explore More Product >>

Get Connected:
+91 79909 93062 | +91 63513 72032 | exports@jdmeditech.com

C-Section Surgery (Cesarean Delivery)

A Cesarean delivery, commonly known as a C-section, is a surgical procedure used to deliver a baby safely when vaginal birth is not possible or poses risks to the mother or child. Thanks to advanced medical equipment and modern surgical standards, C-sections today are highly safe and widely practiced around the world.

Why a C-Section Is Performed
Doctors may recommend a C-section for several medical reasons:

1. Complications During Labor
• Labor not progressing as expected
• Signs of fetal distress
• Issues with the umbilical cord
2. Maternal Health Concerns
• High blood pressure or pre-eclampsia
• Certain active infections
• Placenta previa (placenta covering or blocking the birth canal)
3. Baby’s Position
• Breech position (baby coming feet first)
• Transverse position (lying sideways)
4. Multiple Pregnancy
• Twins, triplets, or higher-order multiples
• Complications affecting one or more babies
5. Previous C-Sections
• Some women may require a repeat C-section depending on uterine healing and pregnancy conditions.

How C-Section Surgery Is Performed

1. Preparation
• The mother receives spinal or epidural anesthesia.
• Vital signs are monitored, and the abdominal area is sterilized.
2. Making the Incision
• A horizontal (bikini line) incision is made on the lower abdomen.
• A second incision is created in the uterus to reach the baby.
3. Delivery of the Baby
• The baby is gently lifted out of the uterus.
• The umbilical cord is cut, and a pediatric team assesses the newborn.
4. Closing the Incisions
• The uterus and abdominal layers are carefully sutured.
• The entire operation typically takes about 40–60 minutes.

Recovery After a C-Section

Recovery from a C-section takes longer than a vaginal birth because it involves major abdominal surgery. Typical recovery steps include:
• Staying in the hospital for 2–4 days
• Pain management and adequate rest
• Avoiding lifting heavy objects
• Gentle walking to improve circulation
• Scheduling follow-up visits to monitor incision healing
Most mothers recover fully within 4–6 weeks.

Benefits of a C-Section
• A safer option in emergency situations
• Protects the health of both mother and baby in high-risk pregnancies
• Planned C-Sections allow scheduling convenience for families

Risks and Considerations
As with any surgical procedure, a C-section carries some risks, such as:
• Infection or excessive bleeding
• Blood clots
• Longer healing period
• Increased risk of breathing problems in babies delivered before 39 weeks (when not medically necessary)
Healthcare professionals evaluate each case carefully before recommending cesarean delivery.

Conclusion
A C-section is a highly effective and reliable method of childbirth when normal delivery isn’t possible or safe. With advanced surgical techniques, professional medical care, and high-quality equipment—such as those supported by JD Meditech—mothers and babies can expect safe outcomes and a smooth recovery.
Understanding the procedure empowers parents, reduces anxiety, and prepares families for a confident birthing experience.

Explore More Product >>

Get Connected:
+91 79909 93062 | +91 63513 72032 | exports@jdmeditech.com

Instruments Used in TURBT (Transurethral Resection of Bladder Tumor) Surgery

During TURBT (Transurethral Resection of Bladder Tumor), a specialized set of urological instruments is used to access and remove bladder tumors via the urethra—without external incisions.

Instrument Names Used in TURBT Surgery:
Resectoscope
Working Element (active part of resectoscope)
Cutting Loop Electrode (monopolar or bipolar)
Light Cable and Camera Head
Irrigation Tubing Set
Saline or Glycine Irrigation Fluid
Ellik Evacuator or Toomey Syringe
Cautery Electrode / Coagulation Electrode
Bladder Distension Sheath
Biopsy Forceps (if tissue sampling is needed)
Electrosurgical Generator Unit (ESU)
e.g., Bipolar Saline Electrosurgical Unit – 400W
Suction Tubing and Collection Canister
Operating Table with Leg Supports (Lithotomy Position)

These instruments work together to perform the resection and removal of bladder tumors through the urethra, without open surgery.

TURBT (Transurethral Resection of Bladder Tumor): Procedure, Benefits & Recovery

TURBT (Transurethral Resection of Bladder Tumor) is typically needed when a person is suspected to have or has been diagnosed with a bladder tumor, especially at early stages. It plays a crucial role in both diagnosis and initial treatment.

We need TURBT (Transurethral Resection of Bladder Tumor) in the following situations:
1. Diagnosis of Bladder Cancer
When a person has symptoms like:
Blood in urine (hematuria)
Frequent or painful urination
Imaging or cystoscopy shows a suspicious mass or lesion in the bladder.
TURBT helps confirm if the tumor is cancerous, and determines the type, grade, and depth of invasion.

2. Initial Treatment of Early-Stage Bladder Cancer
Especially for non-muscle invasive bladder cancer (NMIBC):
Ta (confined to bladder lining)
T1 (into connective tissue)
CIS (flat carcinoma in situ)
TURBT removes the tumor completely, often followed by intravesical therapy (e.g. BCG).

3. Restaging or Repeat TURBT
If the initial tumor is:
High-grade
T1 stage
A second TURBT (within 2–6 weeks) is often done to ensure complete removal and accurate staging.

4. Relief of Urinary Symptoms in Advanced Cancer
When the tumor causes:
Bleeding
Blockage of urine flow
TURBT may be done for palliative purposes, not cure.

Procedure of TURBT (Transurethral Resection of Bladder Tumor)
1. Preoperative Preparation
Admission: Usually done as a day-care or short hospital stay.
Anesthesia: Spinal or general anesthesia is administered.
Positioning: Patient lies on their back with legs supported in stirrups (lithotomy position).

2. Insertion of the Resectoscope
A resectoscope (a thin tube with a camera and surgical loop) is gently inserted through the urethra into the bladder.
No external incision is made.

3. Visual Inspection of the Bladder
The surgeon examines the inside of the bladder for:
Tumor(s) — their size, location, and number
Bladder wall condition
Any suspicious areas for biopsy

4. Tumor Resection
The tumor is shaved off in layers using the resectoscope’s electric loop.
If necessary, tissue from the base of the tumor (including muscle layer) is also taken to check how deep the tumor has grown.

5. Control of Bleeding (Hemostasis)
The surgical area is cauterized to stop bleeding.
Irrigation fluid is used to flush out blood clots and tissue pieces from the bladder.

6. Tissue Collection for Biopsy
Tumor and bladder wall tissue samples are collected and sent for pathological analysis to determine:
Cancer presence
Type, grade, and stage

7. Catheter Placement
A Foley catheter is inserted into the bladder to:
Drain urine
Prevent blockage from clots
Allow bladder to heal
Bladder irrigation may be used to prevent clot formation.

Postoperative Care
Hospital Stay: Usually 1–2 days depending on recovery.
Catheter Removal: Within 24–72 hours typically.
Pathology Report: Usually ready within 7–10 days to guide further treatment.

Duration of Procedure
Typically takes 30–90 minutes depending on the number and size of tumors.

Instruments Used in Bladder Augmentation Surgery: Step-by-Step Guide

During Bladder Augmentation Surgery, various surgical instruments are used to perform the procedure efficiently and safely. Here’s a list of common instruments:

step-by-step list of instruments

1. Preparation Phase:
Surgical Scalpels: For making the initial incision in the abdominal area.
Needle Holder: To securely hold needles for suturing.

2. Accessing the Bladder:
Surgical Scissors: To dissect and open up layers of tissue to reach the bladder.
Bladder Retractors: Used to hold the bladder open for better access.

3. Harvesting Intestinal Tissue:
Intestinal Forceps: To clamp and hold the intestinal segment to be used for augmentation.
Bowel Clamp: To temporarily stop the blood flow to the portion of the intestine being removed.
Scissors or Electrocautery: To cut the section of the intestine.

4. Preparing and Attaching Intestinal Tissue to the Bladder:
Needle Holder and Suturing Instruments: For stitching the harvested segment of intestine to the bladder.
Surgical Scissors: For trimming any excess tissue.
Electrocautery (Diathermy): For coagulating small blood vessels to minimize bleeding.

5. Closing the Incision:
Sutures (Absorbable or Non-absorbable): To close the abdominal and bladder incisions.
Staplers: Occasionally used for closing the larger incisions in the bladder or abdominal wall.

6. Post-Operative Care:
Catheters: A catheter is inserted into the bladder for draining urine during recovery.
Drainage Tubes: May be used to prevent fluid buildup after surgery.

7. Final Inspection and Closure:
Sterile Drapes and Covers: To ensure a sterile environment during surgery.
Sutures or Staplers: To close the abdominal incision.

These instruments work together to ensure that the bladder augmentation procedure is successful and safe.

Bladder Augmentation Surgery: Procedure, Benefits & Recovery Guide

Bladder Augmentation is needed when the bladder is too small, stiff, or unable to store urine properly, causing serious problems.

Bladder Augmentation is needed when:
Bladder cannot hold enough urine (small bladder capacity).
Bladder is too stiff or high-pressure, risking kidney damage.
Severe urinary incontinence that doesn’t improve with medication or catheter use.
Neurogenic bladder (due to spinal cord injury, spina bifida, etc.).
Congenital bladder problems like bladder exstrophy or other birth defects.
Chronic bladder inflammation or damage from radiation, infection, or long-term catheter use.
Urine backing up to kidneys (vesicoureteral reflux) due to poor bladder function.

Procedure of Bladder Augmentation (Augmentation Cystoplasty)

1. Anesthesia
The patient is placed under general anesthesia (completely unconscious).

2. Opening the Abdomen
A surgical incision is made in the lower abdomen to access the bladder.

3. Opening the Bladder
The surgeon cuts open the bladder at the top to prepare it for expansion.

4. Removing a Section of Intestine
A small piece of intestine (usually ileum) is removed.
The intestine is then reconnected so digestion continues normally.

5. Attaching Intestine to Bladder
The intestinal segment is reshaped and sewn to the bladder to increase its size and reduce pressure.

6. Closing the Incision
A catheter is placed into the bladder to drain urine.
The abdominal incision is closed with stitches.

7. Post-Surgery Recovery
Hospital stay: 7–10 days.
Catheter use: 2–3 weeks.
Patient may need to learn self-catheterization for bladder emptying.

Benefits
Increased bladder capacity – can hold more urine comfortably.
Reduced bladder pressure – protects the kidneys from damage.
Improved continence – helps control urine leakage.
Better quality of life – less urgency, fewer infections, and more independence.

Instruments Used in Cystectomy Surgery: A Complete Guide

Here is a list of specific instruments used in cystectomy surgery (bladder removal surgery):

Basic Surgical Instruments:
Scalpel – For making precise incisions in the skin and tissues.
Mayo scissors – For cutting soft tissues during dissection.
Metzenbaum scissors – For finer dissection of delicate tissues.
Needle holder – Used to hold needles while suturing.
Kelly clamp – For clamping blood vessels and tissues to control bleeding.
Mosquito clamp – A smaller version of the Kelly clamp, used for smaller blood vessels.

Instruments for Bladder and Pelvic Surgery:
Balfour retractor – A self-retaining retractor to hold the abdominal cavity open for better access.
DeBakey forceps – For grasping tissues delicately, used to hold and manipulate tissues.
Allis forceps – Used to grasp tissues, especially in deeper regions.
Surgical suction – Used to remove blood and fluids, maintaining a clear surgical field.
Electrocautery (Bovie) – An electrical tool used to cut tissue and coagulate blood vessels to minimize bleeding.
Bladder dissector – To carefully separate the bladder from surrounding tissues.

Laparoscopic or Robotic-Assisted Instruments (if minimally invasive):
Trocars – Tubes inserted into the abdomen to create access points for laparoscopic instruments.
Laparoscope – A small camera inserted through a trocar to view the internal surgical site.
Graspers – Instruments used for holding and manipulating tissues during laparoscopic surgery.
Laparoscopic scissors – Special scissors for cutting tissues during minimally invasive surgery.
Endoscopic stapler – Used for stapling tissues together, often in laparoscopic procedures.

Urinary Diversion Instruments:
Bowel clamps – Used to isolate portions of the bowel for creating urinary diversions, such as an ileal conduit.
Catheters – Used for draining urine during the procedure and post-surgery.
Stents – Tubes used to keep the urinary system open after surgery.
Staplers – Used in creating an ileal conduit or a neobladder.
Stoma measuring device – To measure and create a proper site for the urinary diversion.

Closure Instruments:
Sutures – To close incisions after the procedure.
Staples – Used to close larger incisions or areas that require quicker closure.

These instruments are used to carry out different stages of the cystectomy procedure, including bladder removal, tissue dissection, and urinary diversion creation.

Cystectomy Surgery: Procedure, Types, Recovery & Risks Explained

A cystectomy is a surgical procedure to remove all or part of the urinary bladder. It is most commonly performed to treat bladder cancer, but it may also be done for other conditions like chronic bladder inflammation, severe trauma, or congenital defects.

Types of Cystectomy:
Partial Cystectomy – Only a part of the bladder is removed (usually if cancer is small and localized).
Radical Cystectomy – The entire bladder is removed.
Bladder Cancer (most common reason)
Especially if it is muscle-invasive or high-grade and does not respond to treatments like chemotherapy or BCG.
Severe Bladder Damage
From trauma, radiation therapy, or chronic inflammation.
Painful Bladder Conditions
Such as interstitial cystitis that does not respond to other treatments.
Birth Defects
Rarely, if the bladder is malformed and non-functional.
Neurological Bladder Dysfunction
In very severe cases where the bladder cannot empty or store urine properly, and other treatments fail.

Step-by-Step Cystectomy Procedure
1. Pre-operative Preparation
Medical tests: Blood work, urine tests, imaging (CT/MRI), EKG.
Bowel prep: Cleansing of the intestines if a urinary diversion will involve the bowel.
Fasting: No food or drink for several hours before surgery.
Consent: Patient is informed and signs surgical consent.

2. Anesthesia
General anesthesia is administered — the patient is fully unconscious and pain-free.

3. Positioning and Sterile Prep
The patient is positioned on the operating table.
The abdomen is cleaned and sterilized to prevent infection.

4. Surgical Incision
Open surgery: A vertical incision is made in the lower abdomen.
Minimally invasive (laparoscopic/robotic): Several small incisions are made for camera and tools.

5. Removal of the Bladder and Nearby Organs
The bladder is carefully detached from surrounding tissues.
In men: Bladder + prostate + seminal vesicles are removed

In women: Bladder + uterus + part of vagina + ovaries (sometimes) are removed.

6. Lymph Node Dissection
Pelvic lymph nodes are removed and sent for testing to check for cancer spread.

7. Urinary Diversion Construction

Since the bladder is gone, a new pathway for urine is created:
Ileal conduit: A piece of small intestine is used to connect ureters to a stoma (urine collects in a bag).
Neobladder: A new bladder made from intestine, connected to the urethra (you can urinate normally).
Continent reservoir: A pouch is created inside the body and emptied using a catheter.

8. Closure
All internal structures are checked for leaks.
Drains and catheters are placed.
The incision is closed with sutures or staples.

9. Recovery in Hospital
ICU or recovery room monitoring.
Pain control, IV fluids, and gradual reintroduction of diet.
Patient learns to manage urine diversion (if needed).
Hospital stay: usually 5–10 days.

Instruments in Shock Wave Lithotripsy (SWL) for Kidney Stones

The main instrument used in SWL is the lithotripter — a specialized medical device designed to generate and focus shock waves to break kidney or ureteral stones.

Step-by-Step Instruments Used in Shock Wave Lithotripsy (SWL)

1. Pre-Procedure Stage
Patient Evaluation – Ultrasound Machine | X-ray/CT Scanner – To locate the stone and assess size/location
Vital Monitoring – BP Monitor | ECG Monitor – To monitor heart rate, oxygen, blood pressure
Sedation (if required) – IV line, syringes, anesthetic setup – For patient comfort and pain control

2. Positioning and Preparation
Positioning Patient – Adjustable SWL Table – To properly align the patient with the machine
Shock Transmission Medium – Water cushion, gel pad, or water bath – Helps conduct shock waves to the body

3. Lithotripsy Procedure
Stone Localization – Fluoroscopy or Ultrasound Guidance – Real-time targeting of the stone
Shock Wave Delivery – Lithotripter Machine – Generates and focuses shock waves on stone

Types of Lithotripters:
Electrohydraulic Lithotripter
Electromagnetic Lithotripter
Piezoelectric Lithotripter

4. Post-Procedure Monitoring
Vital Sign Monitoring – ECG, Pulse Oximeter, BP Monitor – To check patient stability after treatment
Urine Output Observation – Urine collection system, Urinometer – To detect stone fragments and urine flow
Follow-Up Imaging – Ultrasound or X-ray – To confirm stone clearance